

Accurate data is key in 2024, and its importance will continue to grow as we rely more and more on AI and automated bidding strategies. No matter what advertising platform you use, having more accurate data enables you to better optimize your campaign performance.
Google Ads has enhanced conversions specifically for this purpose. It allows you to enrich your conversion data with first-party user data. Let’s look at how you can set it up and why you should do it.
What are enhanced conversions in Google Ads?
Enhanced conversions improve conversion measurement accuracy and unlock powerful bidding. It supplements existing tags with hashed first-party conversion data sent to Google in a privacy-safe way. The feature uses a secure one-way hash algorithm on customer data like email addresses before sending. This hashing algorithm is called SHA256.
You can set up enhanced conversions using the Google tag, Google Tag Manager, or Google Ads API.
Enhanced conversions give you a better insight into what happens after the users click on the ad. For example, the user signs up for your product or a newsletter. You might think, “Well, what’s the difference? I already track that”. Yes, but with enhanced conversions, that data is enriched with first-party user data. Simply put, it’s more accurate.
How does enhanced conversion work?
When customers complete website conversions, you receive first-party data like email addresses and names. This data gets captured in conversion tracking tags, hashed, and sent to Google. Then, it’s used to enhance conversion measurement.
Hashed means that the data is hidden under various characters to protect users’ data. You don’t have to be concerned about privacy here.
There are two types of enhanced conversions:
Enhanced conversions for web. More suitable for advertisers who want to track sales and events that happen on a website.
Enhanced conversions for leads. Design for advertisers who want to track sales that happen off a website (for example, phone or email) from website leads.
There is a difference in how they work, so let’s get into this.
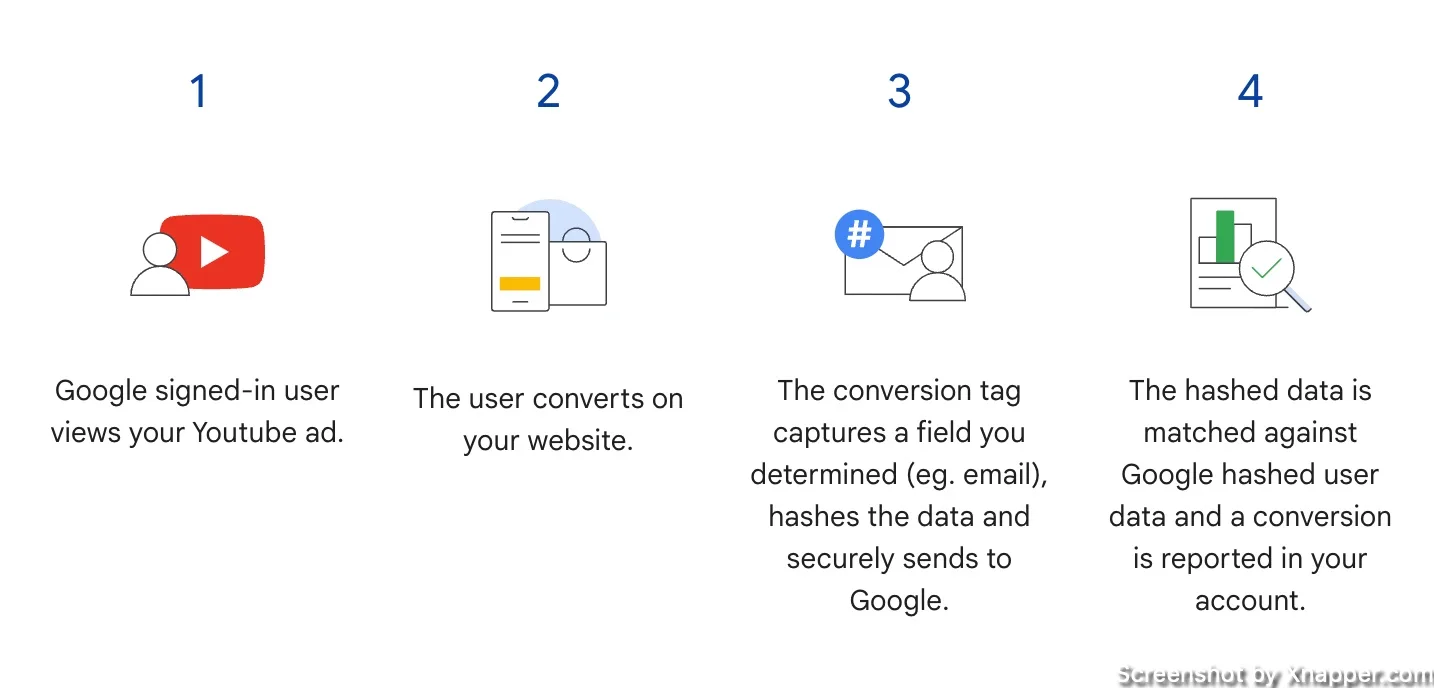
Enhanced conversions for web
With website conversions, it’s easier as the data you get while users complete your conversion is already there. It is captured by tracking tags, hashed and sent to Google. After this, Google matches that data to signed in users with their Google account (think Gmail) who engaged with your ad.
Obviously, even with enhanced conversions, nothing is 100% accurate. People might not have a Google account, they might not have signed it, etc. But there are clear benefits:
- You can recover conversions that otherwise wouldn’t have been measured
- If you’re using automated bidding strategies, you can improve it with better data.
- And, of course, secured first-party data.
There are 3 ways you can implement enhanced conversions:
Google Tag Manager: If you currently use Google Tag Manager for conversion tracking, you will need only slight modifications. I will go over that later in the post.
The Google tag: If you have a Google tag directly on your page, you will need to update that script. I advise leaving it to the developer. I won’t get into this, so all I can give is a link to Google documentation.
Google Ads API: Same as above, leave it to the developer as working with Google Ads API requires specific knowledge. If you already are working with API, then implementing enhanced conversions will be a breeze.
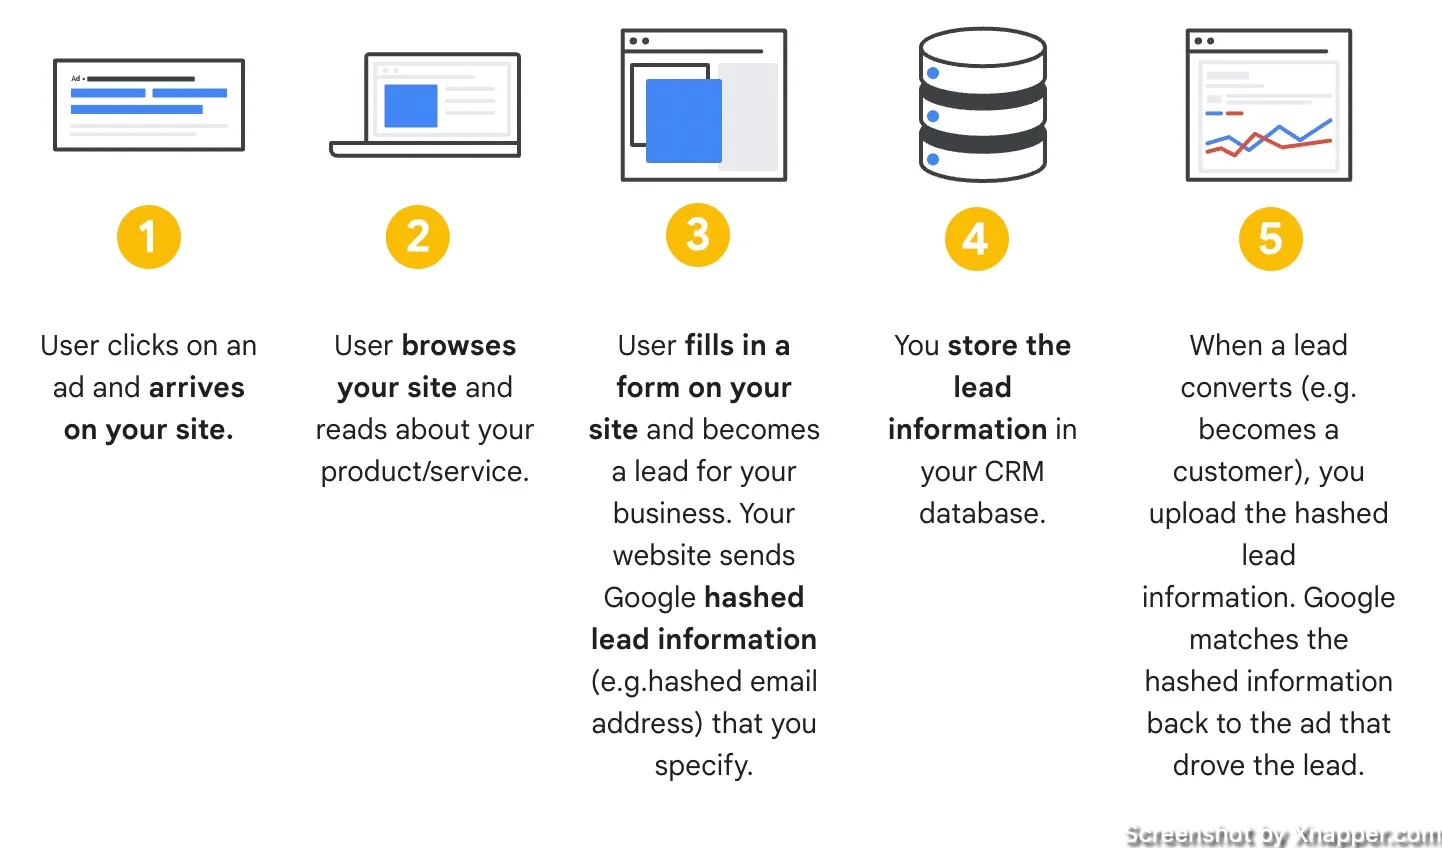
Enhanced conversions for leads
This is a bit different but more flexible way to enhance conversions for your leads. The way it works is you upload or import the data from your lead forms (csv, CRM). What’s cool about it is that it doesn’t require you to modify your lead forms or CRM systems to receive a Google Click ID (GCLID). Instead, it uses information that was already captured about your leads, like email addresses, to measure conversions.
If you work with lead generation, you know that Google might not bring the best leads, especially if you run PMax. Additional signals are needed so Google can better understand the quality of those leads ideally, if that lead made a purchase or signed a contract, some action that would indicate that it brought money to your business.
Same as leads for websites, it can be implemented via Tag Manager or Google Tag.
Why do you need enhanced conversions?
Data privacy has recently become a major concern for users and companies. Laws like GDPR and CCPA, and browser updates like Safari’s ITP and Firefox’s ETP, make tracking user data harder for advertisers. This shift makes features like Google’s enhanced conversions essential for accurate tracking while protecting user privacy.
GDPR
Two significant data privacy laws are the GDPR and CCPA. The GDPR was introduced by the European Union in May 2018 to give citizens more control over their personal data. It applies to all companies that process EU citizens’ data, regardless of location. Companies must obtain explicit user consent before collecting data and allow users to access, delete, or modify it. Non-compliant companies face significant fines.
CCPA
California introduced the CCPA in January 2020 to empower residents’ personal data control. The act applied to companies doing business in California, meeting revenue and data processing criteria. CCPA required companies to disclose collected personal data, allow users to opt out of data sales, and delete data upon request. Non-compliance resulted in significant fines. CCPA and GDPR increased user data transparency and control but challenged companies’ accurate tracking. Features like Google’s enhanced conversions ensured accurate conversion tracking while protecting user privacy and operating with restricted data processing.
Safari’s ITP
Safari’s Intelligent Tracking Prevention (ITP) and Firefox’s Enhanced Tracking Protection (ETP) make tracking user data harder for advertisers and marketers. ITP was first introduced in 2017 with Safari 11.0’s release. Its goal is to limit third-party cookies’ ability to track users across websites, improving user privacy. ITP deletes third-party cookies after 24 hours of inactivity or 30 days. It also limits third-party cookies’ access to first-party cookies, making user tracking harder.
Firefox ETP
Firefox introduced Enhanced Tracking Protection in 2018 with Firefox 63.0. It blocks third-party tracking cookies and technologies by default, improving user privacy. ETP uses a list to block tracking cookies and technologies. ETP also blocks fingerprinting, a technique tracking users based on browser configurations. Both ETP and ITP have been updated, limiting third-party tracking abilities.
Updates made it difficult for advertisers to track user data, leading to a need for first-party data and features like Google Ads enhanced conversions.
How to set up enhanced conversions with GTM?
I will be using Tag Manager as I don’t have a developer on hand. If you do, I would either consult with a developer or just give them this task.
I assume you already have a Google Ads conversion in your GTM. If not, I have a post on how to create conversions in GTM for Google Ads.
There is a reason I mentioned that if you do have a developer, let them work on that, as there will be some JavaScript involved. You need to capture users’ data on the website. For example, when users sign up or complete a purchase, they provide some personal information, like an email. You need to extract that email so it can be used in your Google Ads conversions tag. You need to show Google where this email is.
There are a couple of ways to do it, at least a couple that I know of. One is to use a data layer. I know this might not be familiar to you, but to most developers this is basic knowledge. Google uses a data layer to pass a lot of information as well. You only need to ask a developer to add additional information to the datalayer you are using when a user signs up, or makes a purchase.
It might look something like this:
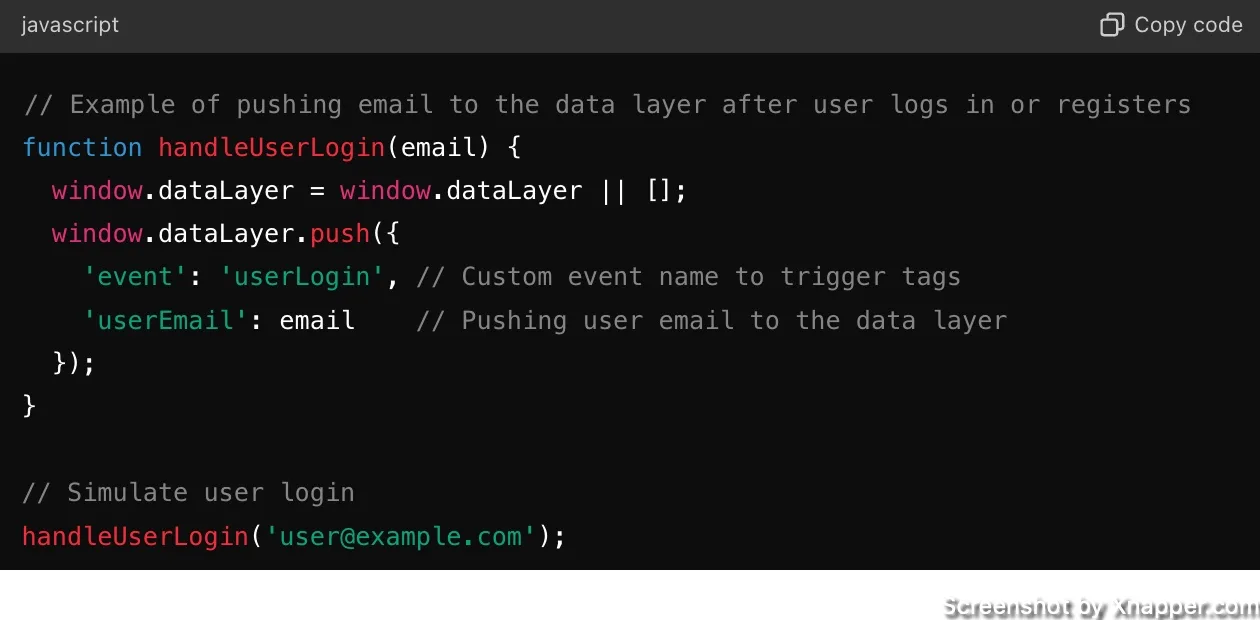
Then, you would use that variable (userEmail) in GTM to tell Google where to take the email from. I will show you how later on.
Another way is to write a JavaScript to extract that email from your pager (or URL). Ideally, ask a developer to do that. But I don’t have one, so I used chatGPT to do that for me.
When you subscribe to my newsletter, on a thank you page, information is passed in the URL:
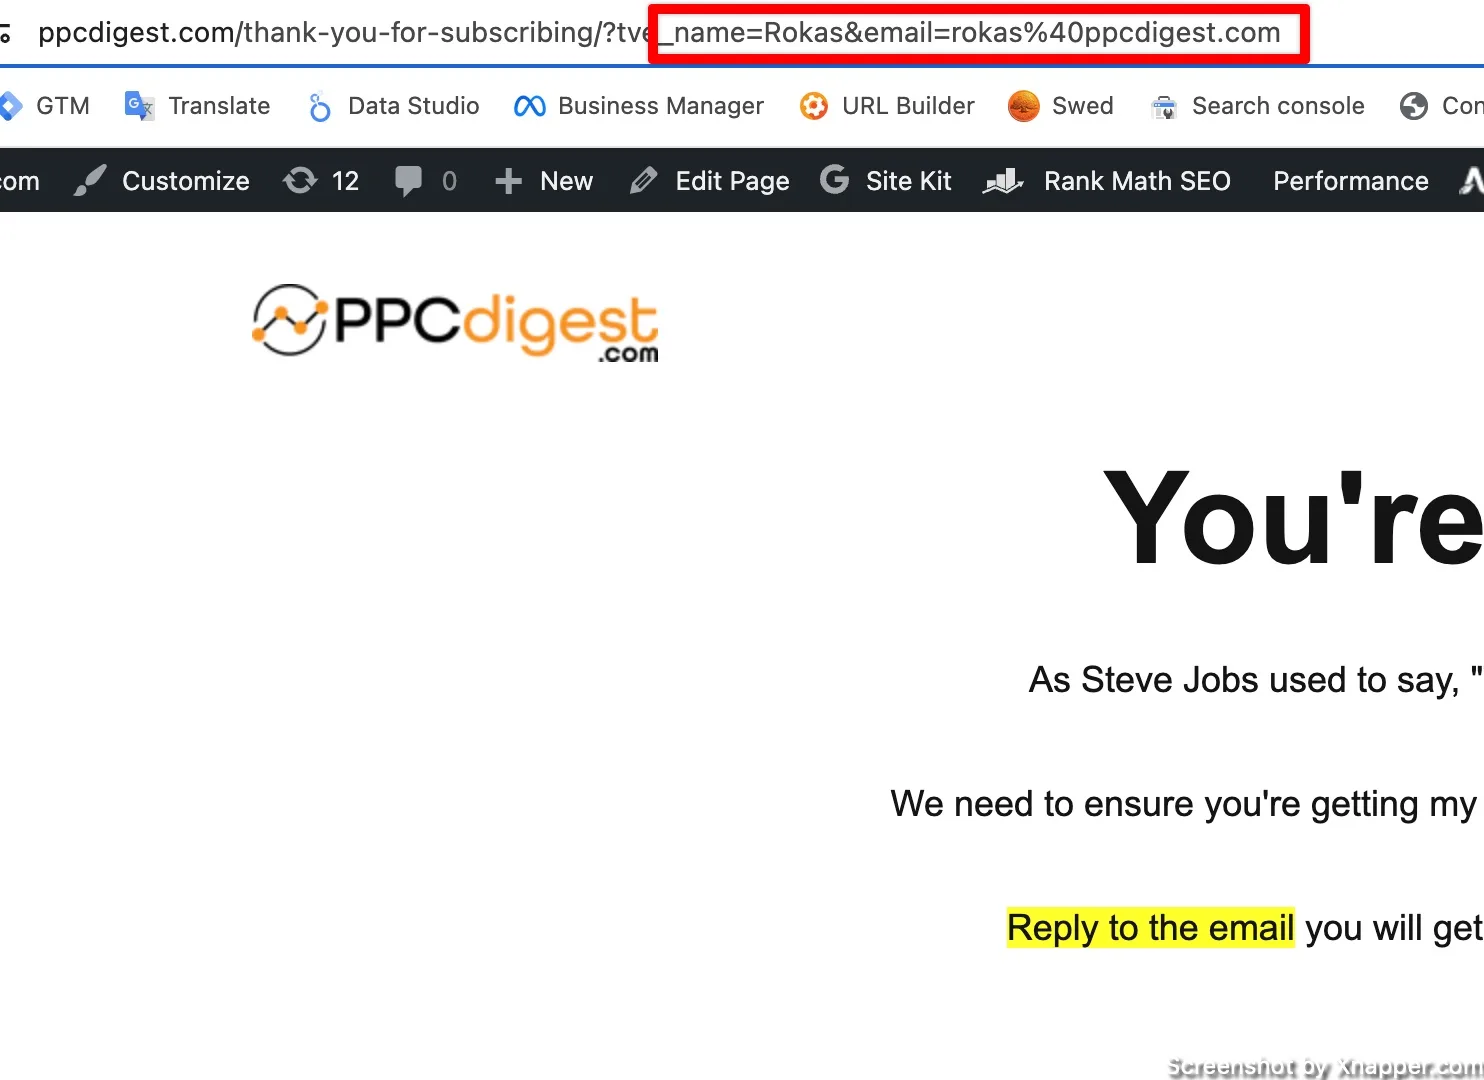
So I showed chatGPT the URL and asked it to write a JavaScript that I can use in Google Tag Manager to extract an email from URL. Here’s the code if you want to use it:
function() {
  try {
    // Parsing the current URL for query parameters
    var urlParams = new URLSearchParams(window.location.search);

    // Attempt to retrieve 'email' parameter from URL
    if (urlParams.has('email')) {
      var email = urlParams.get('email');
      // Decode potentially encoded characters in email
      return decodeURIComponent(email);
    }

    // Fallback to find an email input field
    var emailInput = document.querySelector('input[type="email"]');
    if (emailInput && emailInput.value) {
      return emailInput.value;
    }

    // If no email in URL or input field, then search within specific text elements
    var emailText = document.querySelector('p#email, span#email');
    if (emailText) {
      var emailRegex = /[a-zA-Z0-9._-]+@[a-zA-Z0-9.-]+\.[a-zA-Z]{2,6}/;
      var match = emailText.textContent.match(emailRegex);
      if (match) {
        return match[0];
      }
    }
  } catch (e) {
    console.error('Error extracting email:', e);
  }

  return null; // Return null if no email found
}
Please remember that this is based on my URL example. You might have a different setup, or the email might not be passed in the URL but somewhere in the code.
Updating your Google Ads conversion tag
Now, we go into GTM. Find Variables and click to add a new one. We will have to create a JavaScript variable to extract email from the page. Select new and then click on Custom JavaScript.
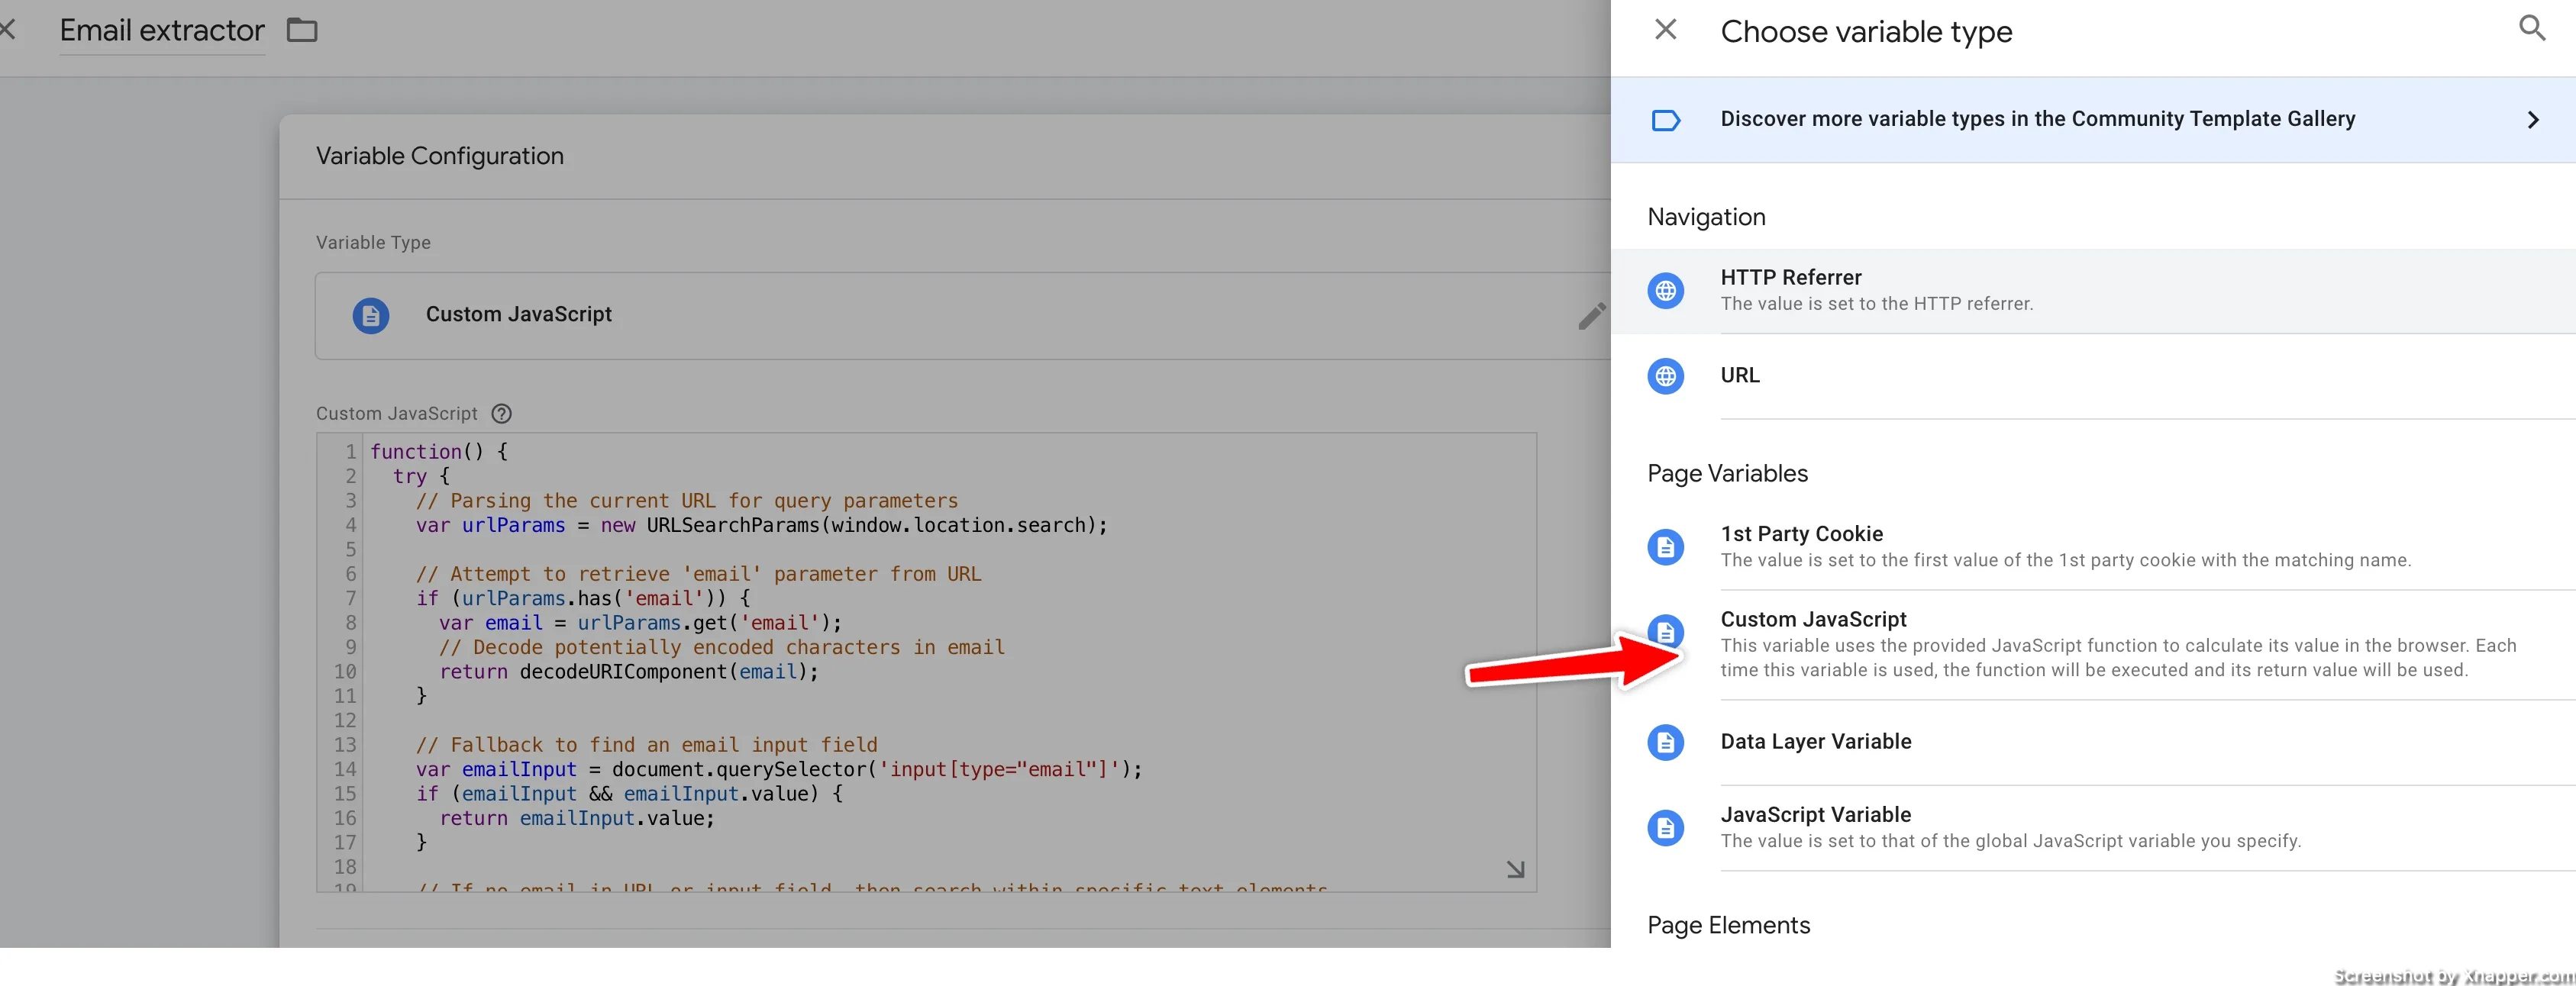
Paste the code you got from me or from chatGPT. Save the variable. Now click to create another variable. This time, we will create a User-provided Data variable.
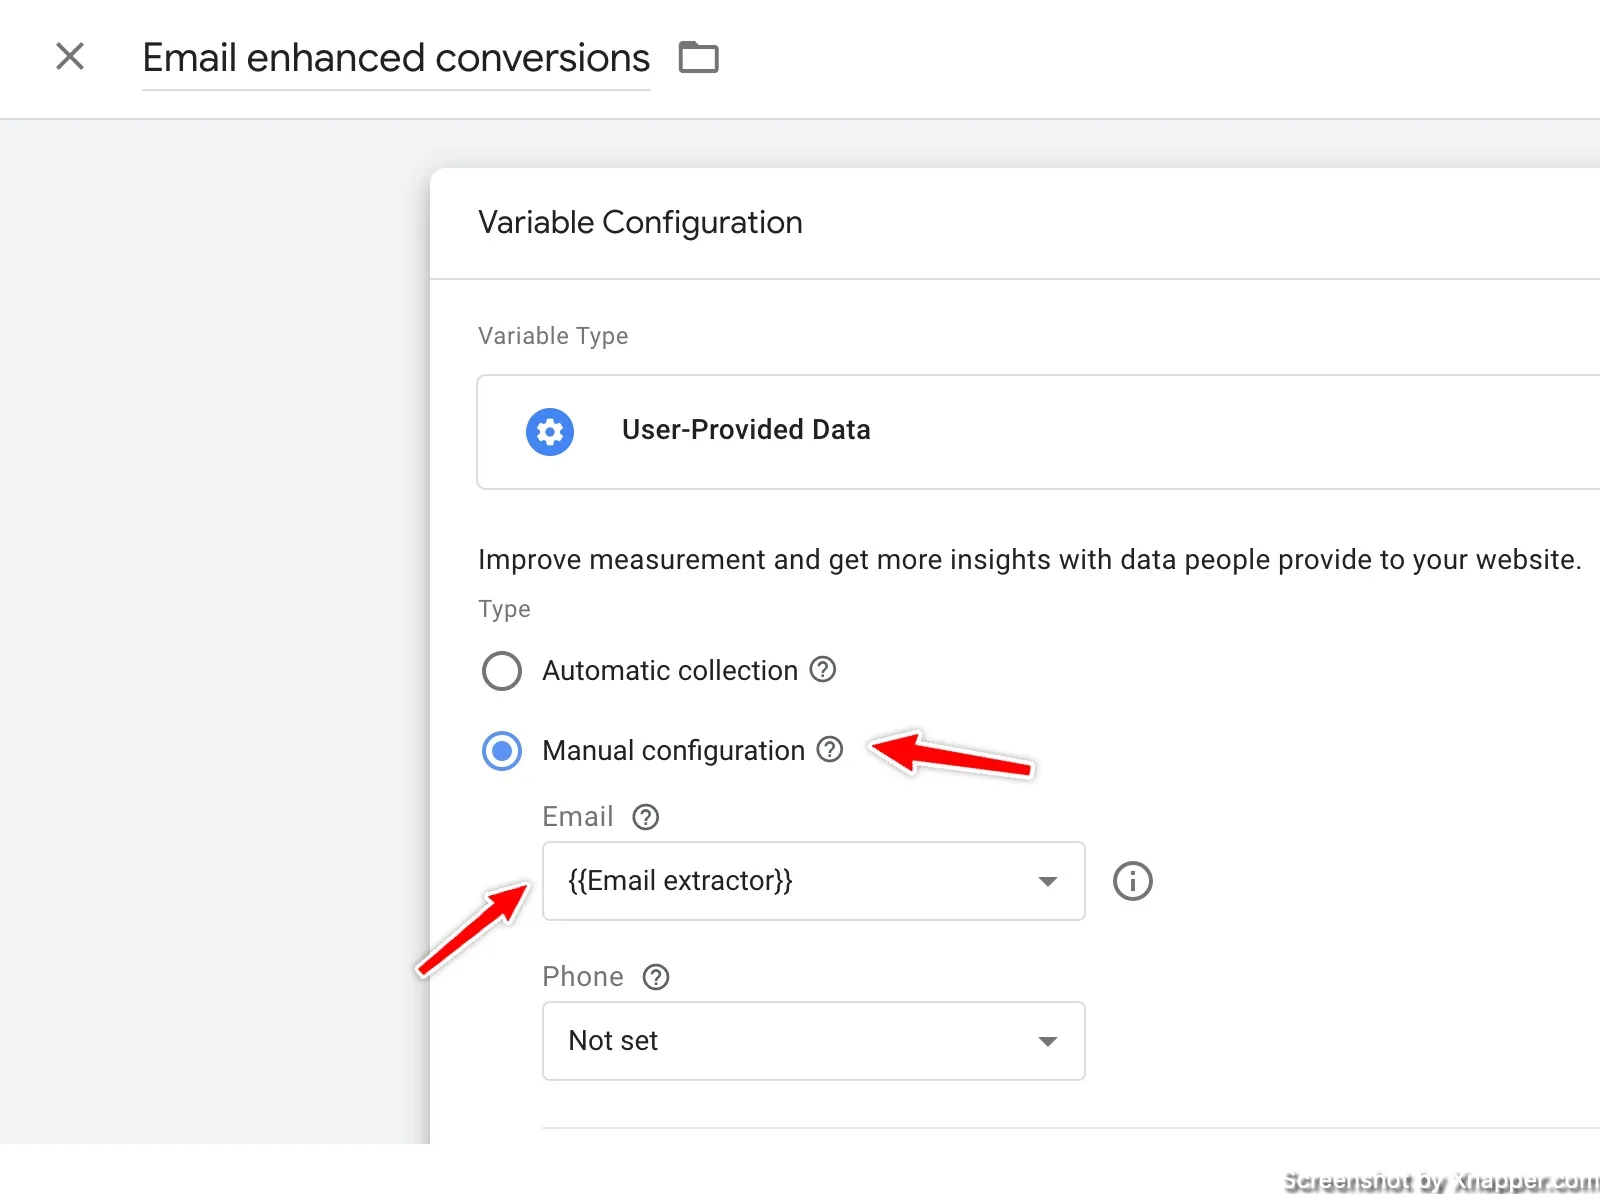
Select manual configuration, and in the email drop-down, find the variable we created before. The one that extracts the email. Note that since we’re only focusing on email you don’t have to set other data fields.
Name the variable so you know what it is. Click save.
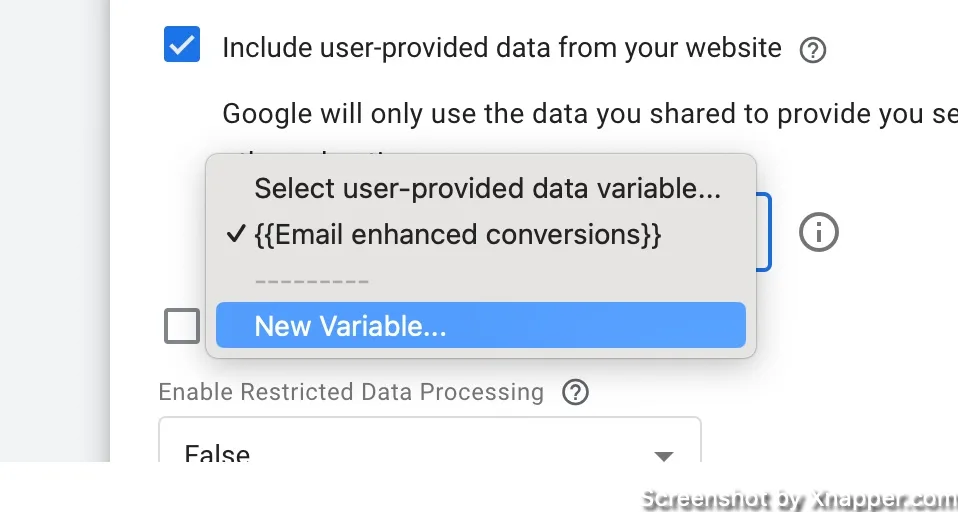
Find your Google Ads conversion tag. Edit the tag and click on the check box as shown below.

Here, you will have to select where the email is coming from. That is why we added it to the data layer or extracted it from the page. Select the one we just created.
Now save the tag and test it. Click on Preview, enter your landing page with the form, and enter your email. When you view your events in the GTM Preview, you should see your created variables. One that extracts an email. And then the one that sends enhanced conversion data.
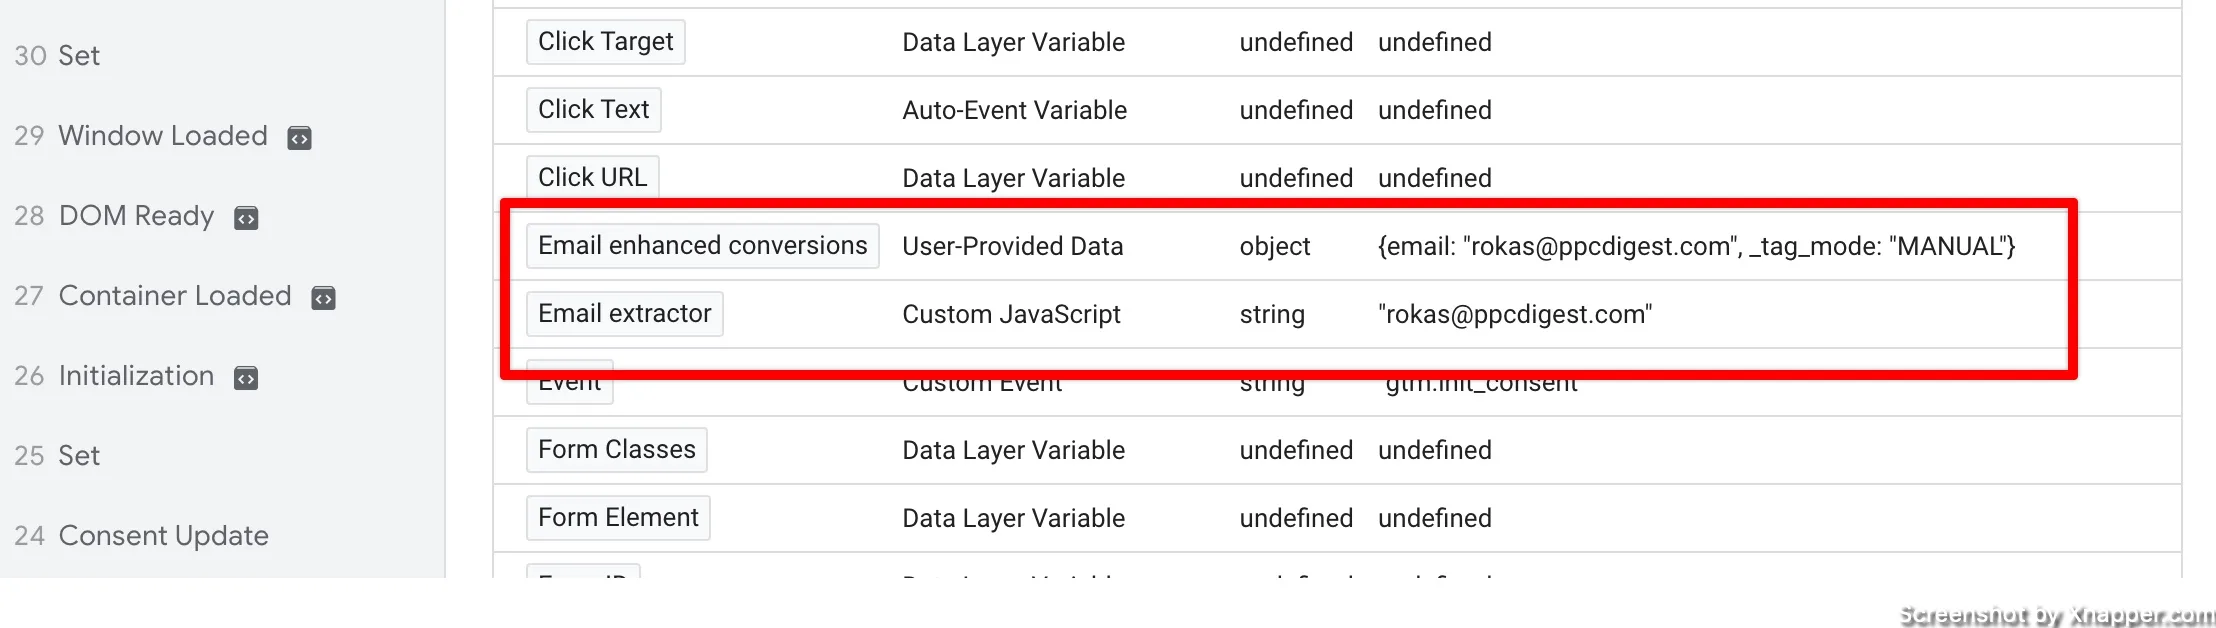
If you don’t see your email here, that means that your extractor doesn’t work. There might be forms that work differently, and it won’t be that easy to extract an email. I tried it with some email platforms, but this method did not work as the form is embedded, and the data is not visible.
Unfortunately, my knowledge is limited here since I’m not a developer. You can:
- Ask a developer (higher someone on Upwork or Fiverr)
- Ask Reddit for help. I’m sure there are plenty of developer groups.
- Google for a solution, maybe there is a plugin, extension or some software.
If everything works, hit Publish, and you have enhanced conversions.
If you’re using a data layer
The process is almost the same. You don’t need to create a variable that extracts email since it’s going to be in the data layer. All you have to do is to create a Data Layer Variable.
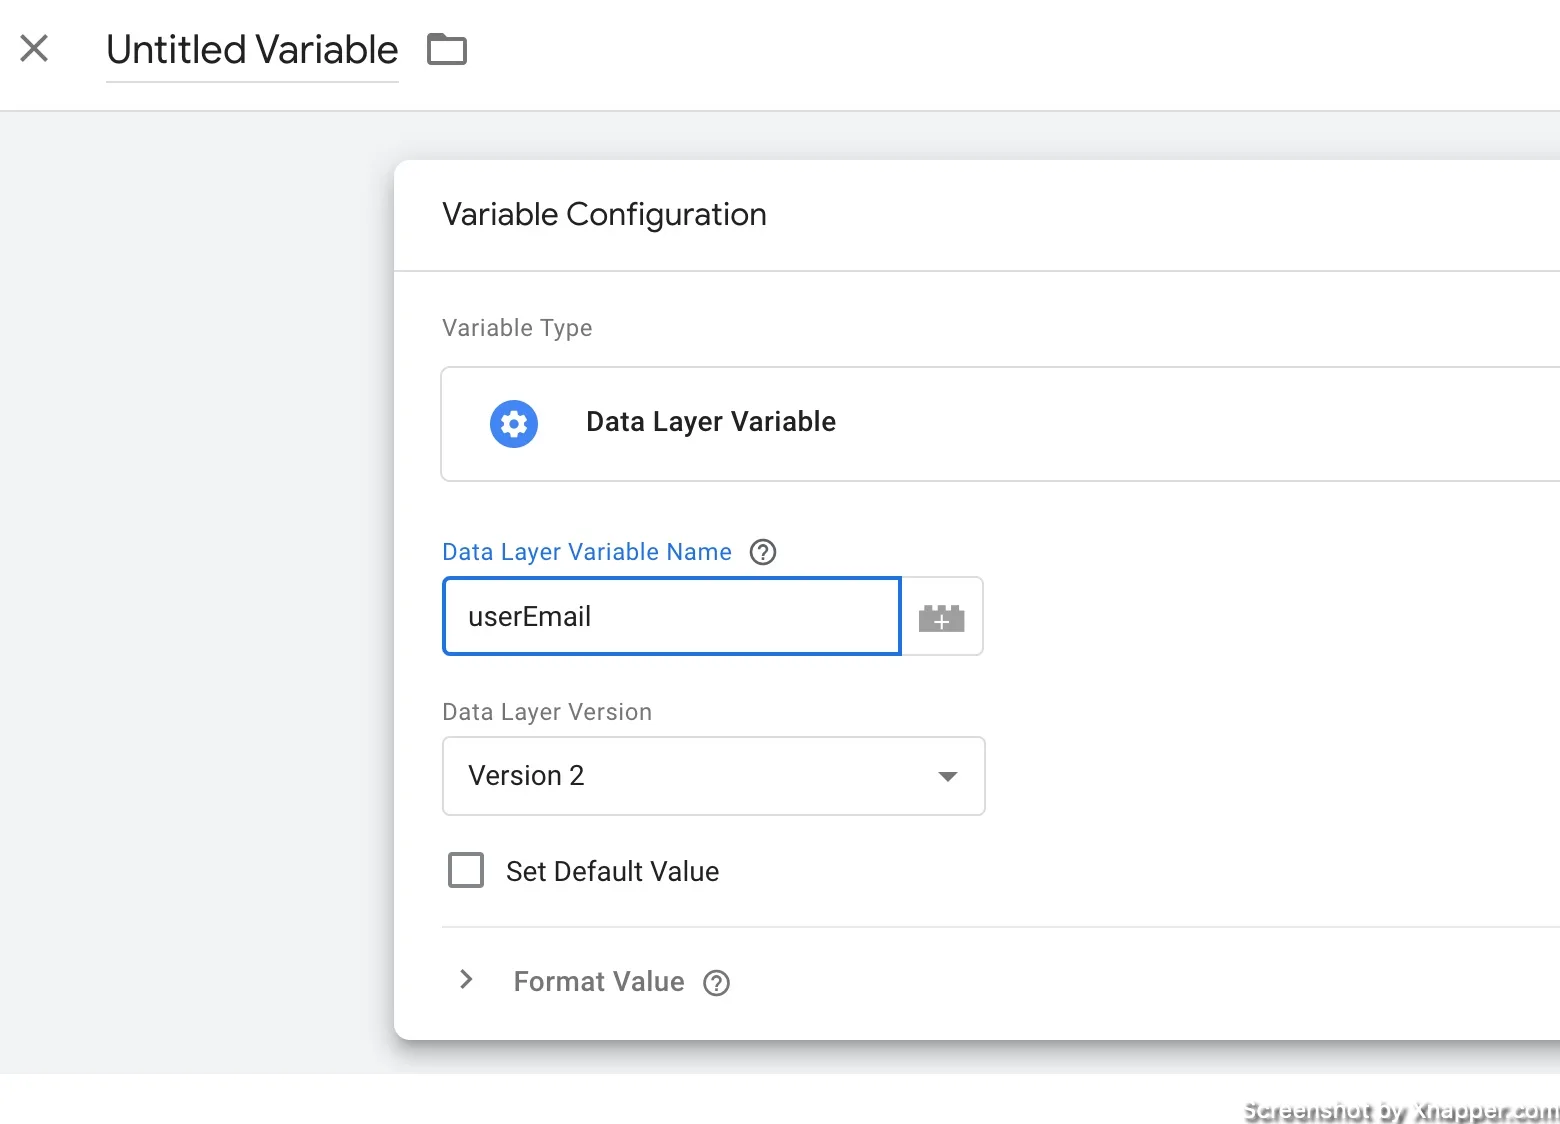
If we use the example I’ve shown above, then your variable name is userEmail. Enter it here exactly as it is named in the data layer. Click save. Then, update the Google Ads tag the same way we did before, selecting this newly created variable.
Enable enhanced conversions in Google Ads account
One last step is to enable enhanced conversions in your Google Ads account. Click on Goals and Settings. Find Enhanced conversions, expand, and select to turn it on. The choose Google Tag Manager as the source.
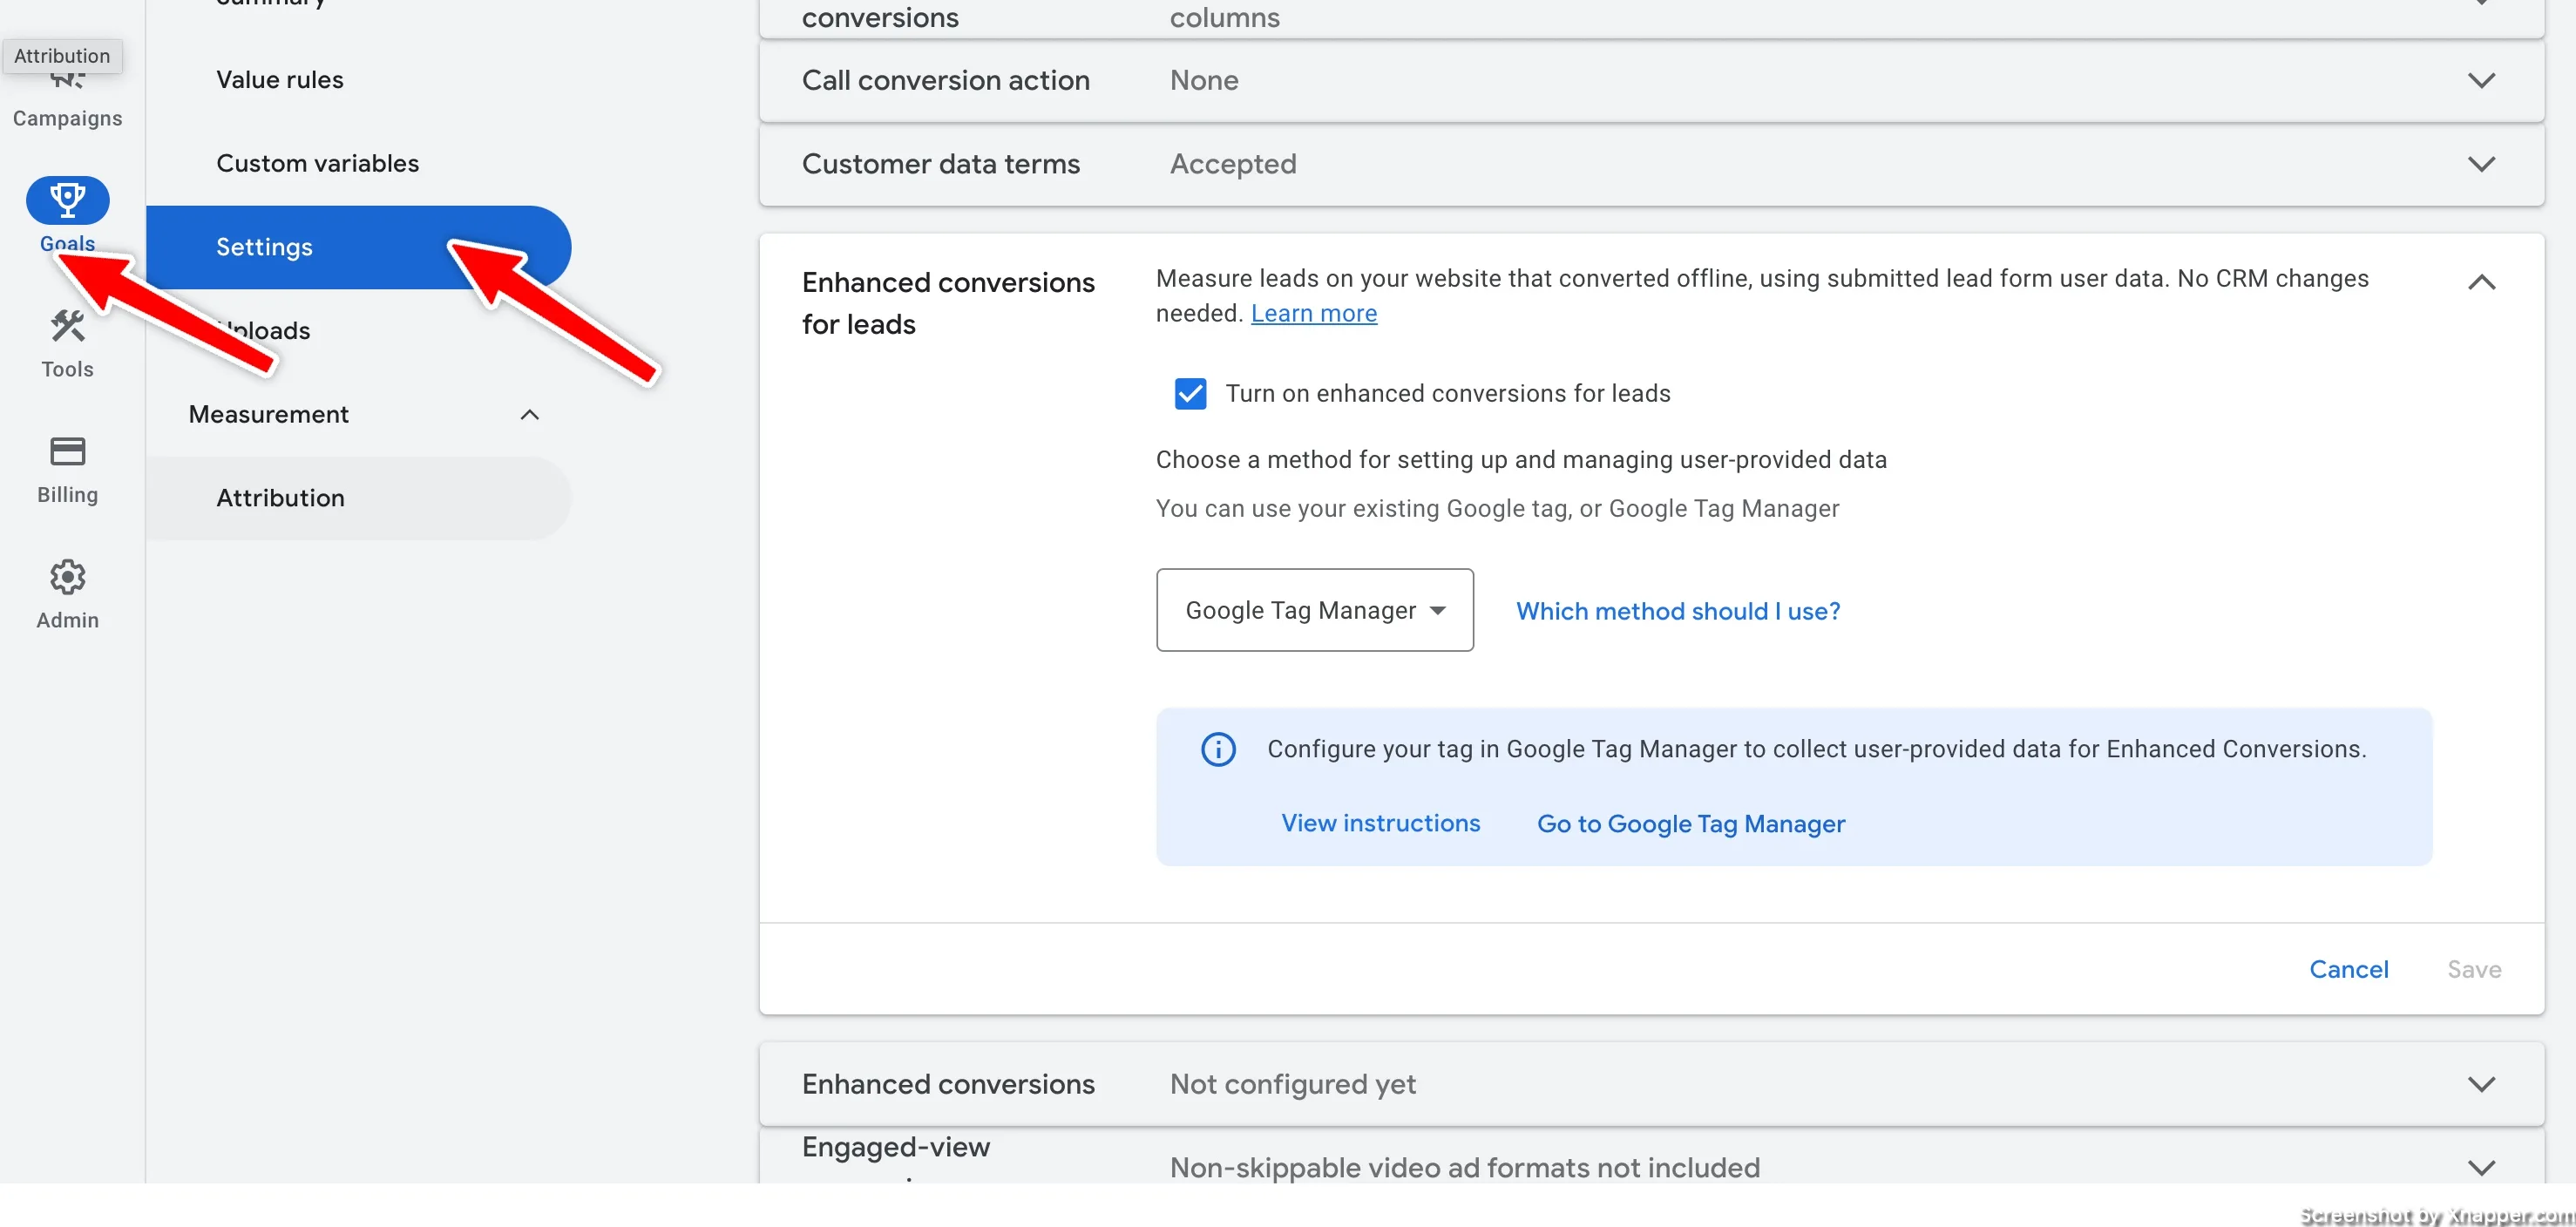
The above image is the enhanced conversions for leads. The one for the website is right below it.
If you received a lot of conversions, you might see numbers fluctuate a little bit. I haven’t noticed it on my several accounts, but some of my friends reported seeing a little drop. In any case, don’t be alarmed.
Upon setting up enhanced conversions, I would encourage testing some of those automated bidding strategies. Now that your data is more accurate, you will be sending better signals to Google’s machine-learning algorithms.
⭐️ If you liked the post, please give it some love by sharing my tweet on X.com.🙏
I share weekly tips on how to create, manage, and scale Google Ads campaigns. Subscribe to my free newsletter.
I’m also down with connecting on LinkedIn.
Or follow me on X, for some quick updates and fast insights.
