
Google Ads without conversions are useless. OK, maybe I’m exaggerating a little bit. But conversions are important, as well as adding tracking pixels and remarketing tags. But all of this sounds like a job for a developer. Which it could be, and it is. But with Google Tag Manager or GTM, it can be a marketer’s job. Your job.
Placing stuff on websites for marketers was always a tedious task. With GTM, it became a lot easier. But I still see people struggling to add tracking scripts and snippets of code. Even though Google Tag Manager is a powerful tool, you don’t have to use it for (or learn) everything. Just for the stuff you need. Like Google Ads.
So, let’s take a look at how GTM and Google Ads are a match made in heaven. Development heaven, that is. A little tech humor.
What is Google Tag Manager or GTM?
It’s a free tool from Google that allows you to add and manage marketing tags (snippets of code or tracking pixels) on your website (or mobile app) without having to modify the code. In other words, you don’t need a developer to add a tag to your website. Often called just GTM. And this is a big plus since many smaller businesses don’t have an in-house developer. So having this ability saves a lot of time and money.
Let’s quickly go through how it works. I’m not a developer, so I will keep it simple.
If you had to add several tags or code snippets, you would have to add them one by one to your website:

But that is not very optimal. First, you will have to either do it your self each time, send to a developer or get a plugin for each tag. Secondly, there will be many code snippets, that usually slow down the website. Thirdly, it’s hard to manage them as they are not in one place.
With GTM it becomes a lot easier, as it works as a central box for all the tags:

Instead of adding all these tags to your website, you create them in your GTM. And ad only tag manager snippet that “controls” all the tags. You don’t need todo anything else. As soon as your GTM is set up, all you do is ad a new snippet or a pixel, click publish and it’s live. And you can test if it’s working your self.
For any marketer this is a life saver. Let’s see how to set up a Google Tag Manager (GTM) account.
How to set up Google Tag Manager?
You need to install the Tag Manager, so it is ready to do that for you. Get a GTM account here. You will need your Gmail. Once you sign up, you will be given a snippet of code to add to your site. I know, I said you don’t need a developer. But this is the only snippet you will have to add. And there are plugins for that as well.
For example, if you use WordPress, you can install this plugin and it will adding GTM a lot easier. For other content management systems there should be plugins as well. Just go to a plugin store and do a search on “GTM” or “Google Tag manager”.
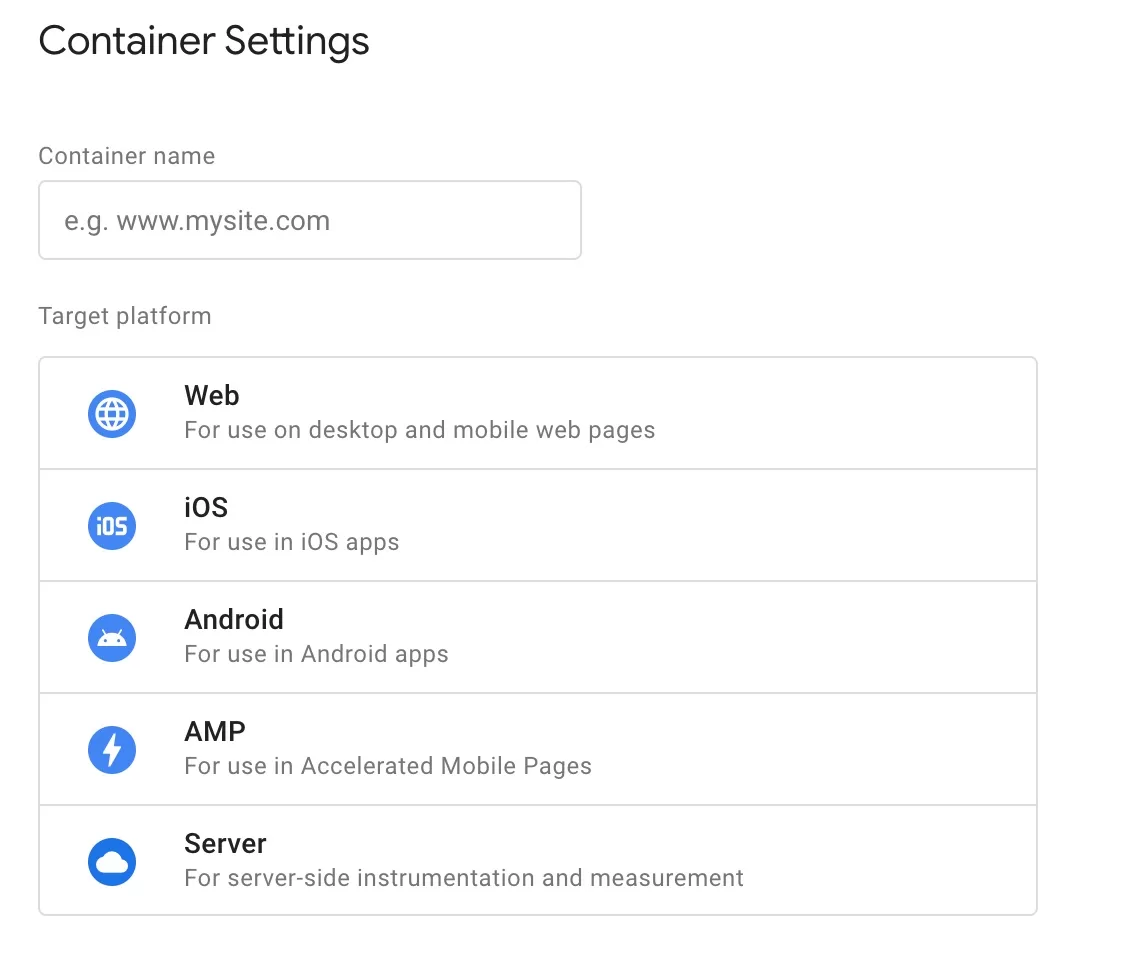
After you create your account, you will be asked to name the container and select the platform. Most likely website. Your account can have many containers, which are usually just different websites. So if you have several websites (platforms), you only need one GTM account.
After that you will be promted with the snippet of code you have to place on your site.
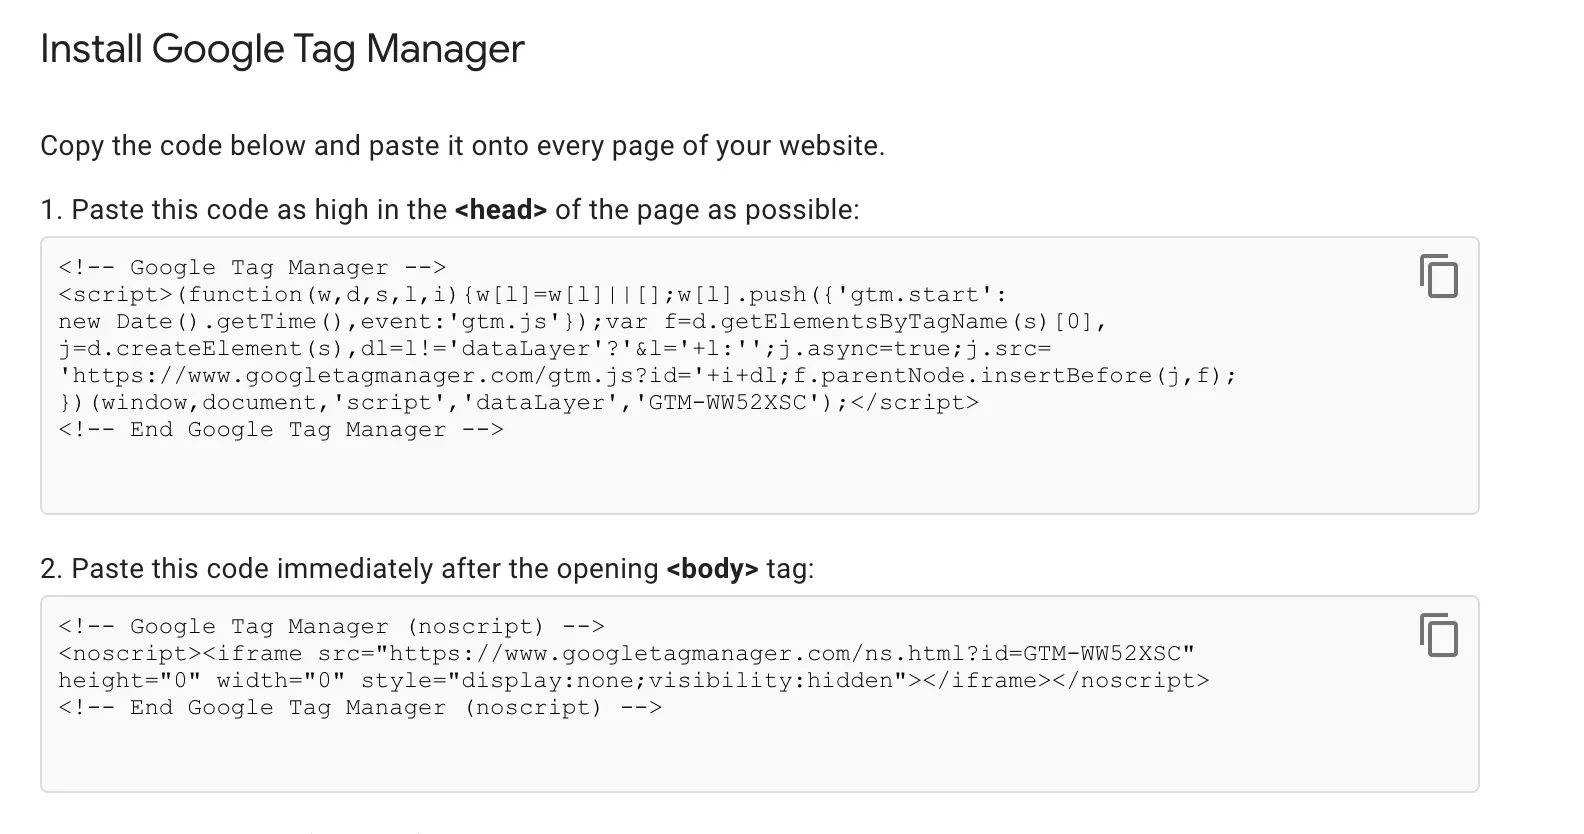
If you do have a developer, send them this. If you don’t you can use a plugin as mentioned above or ad the tag yourself. Obviously you need to know how to do it.
Some plugins won’t require the whole snippet, just your GTM ID.

Just so you know, all snippets looks the same, except for the highlighted part, which is the ID. You can copy that and enter where required.
Once you’re finished, just hit Submit in the right hand corner and then Publish.

You will be asked to name each version you publish. Ideally you should enter something that will help you understand what you published. For example, if I just added Google Ads conversion tag, I would name this version “google ads tag”. It is optional, but helps if you publish often. Because, one other benefit of GTM is that you can revert to any previous version. Sometimes when you add something, you might “break” the website and it stops working, then you can revert quickly. Trust me, it will happen to you sooner or later.
How to create conversion in Google Ads?
Now that you have GTM set up, let’s create a conversion in your Google Ads account. Head to Tools and Settings > Conversions and click on create a new conversion action.
Most likely you will be creating a website conversion so let’s start there:

Once you click on it, Google will ask to enter your website and will try to find conversions. It may find some, and recommend, but you know me. Not a big fan of what Google recommends.
Let’s create conversion manually.

Google will ask you to provide some of the details for your conversions.
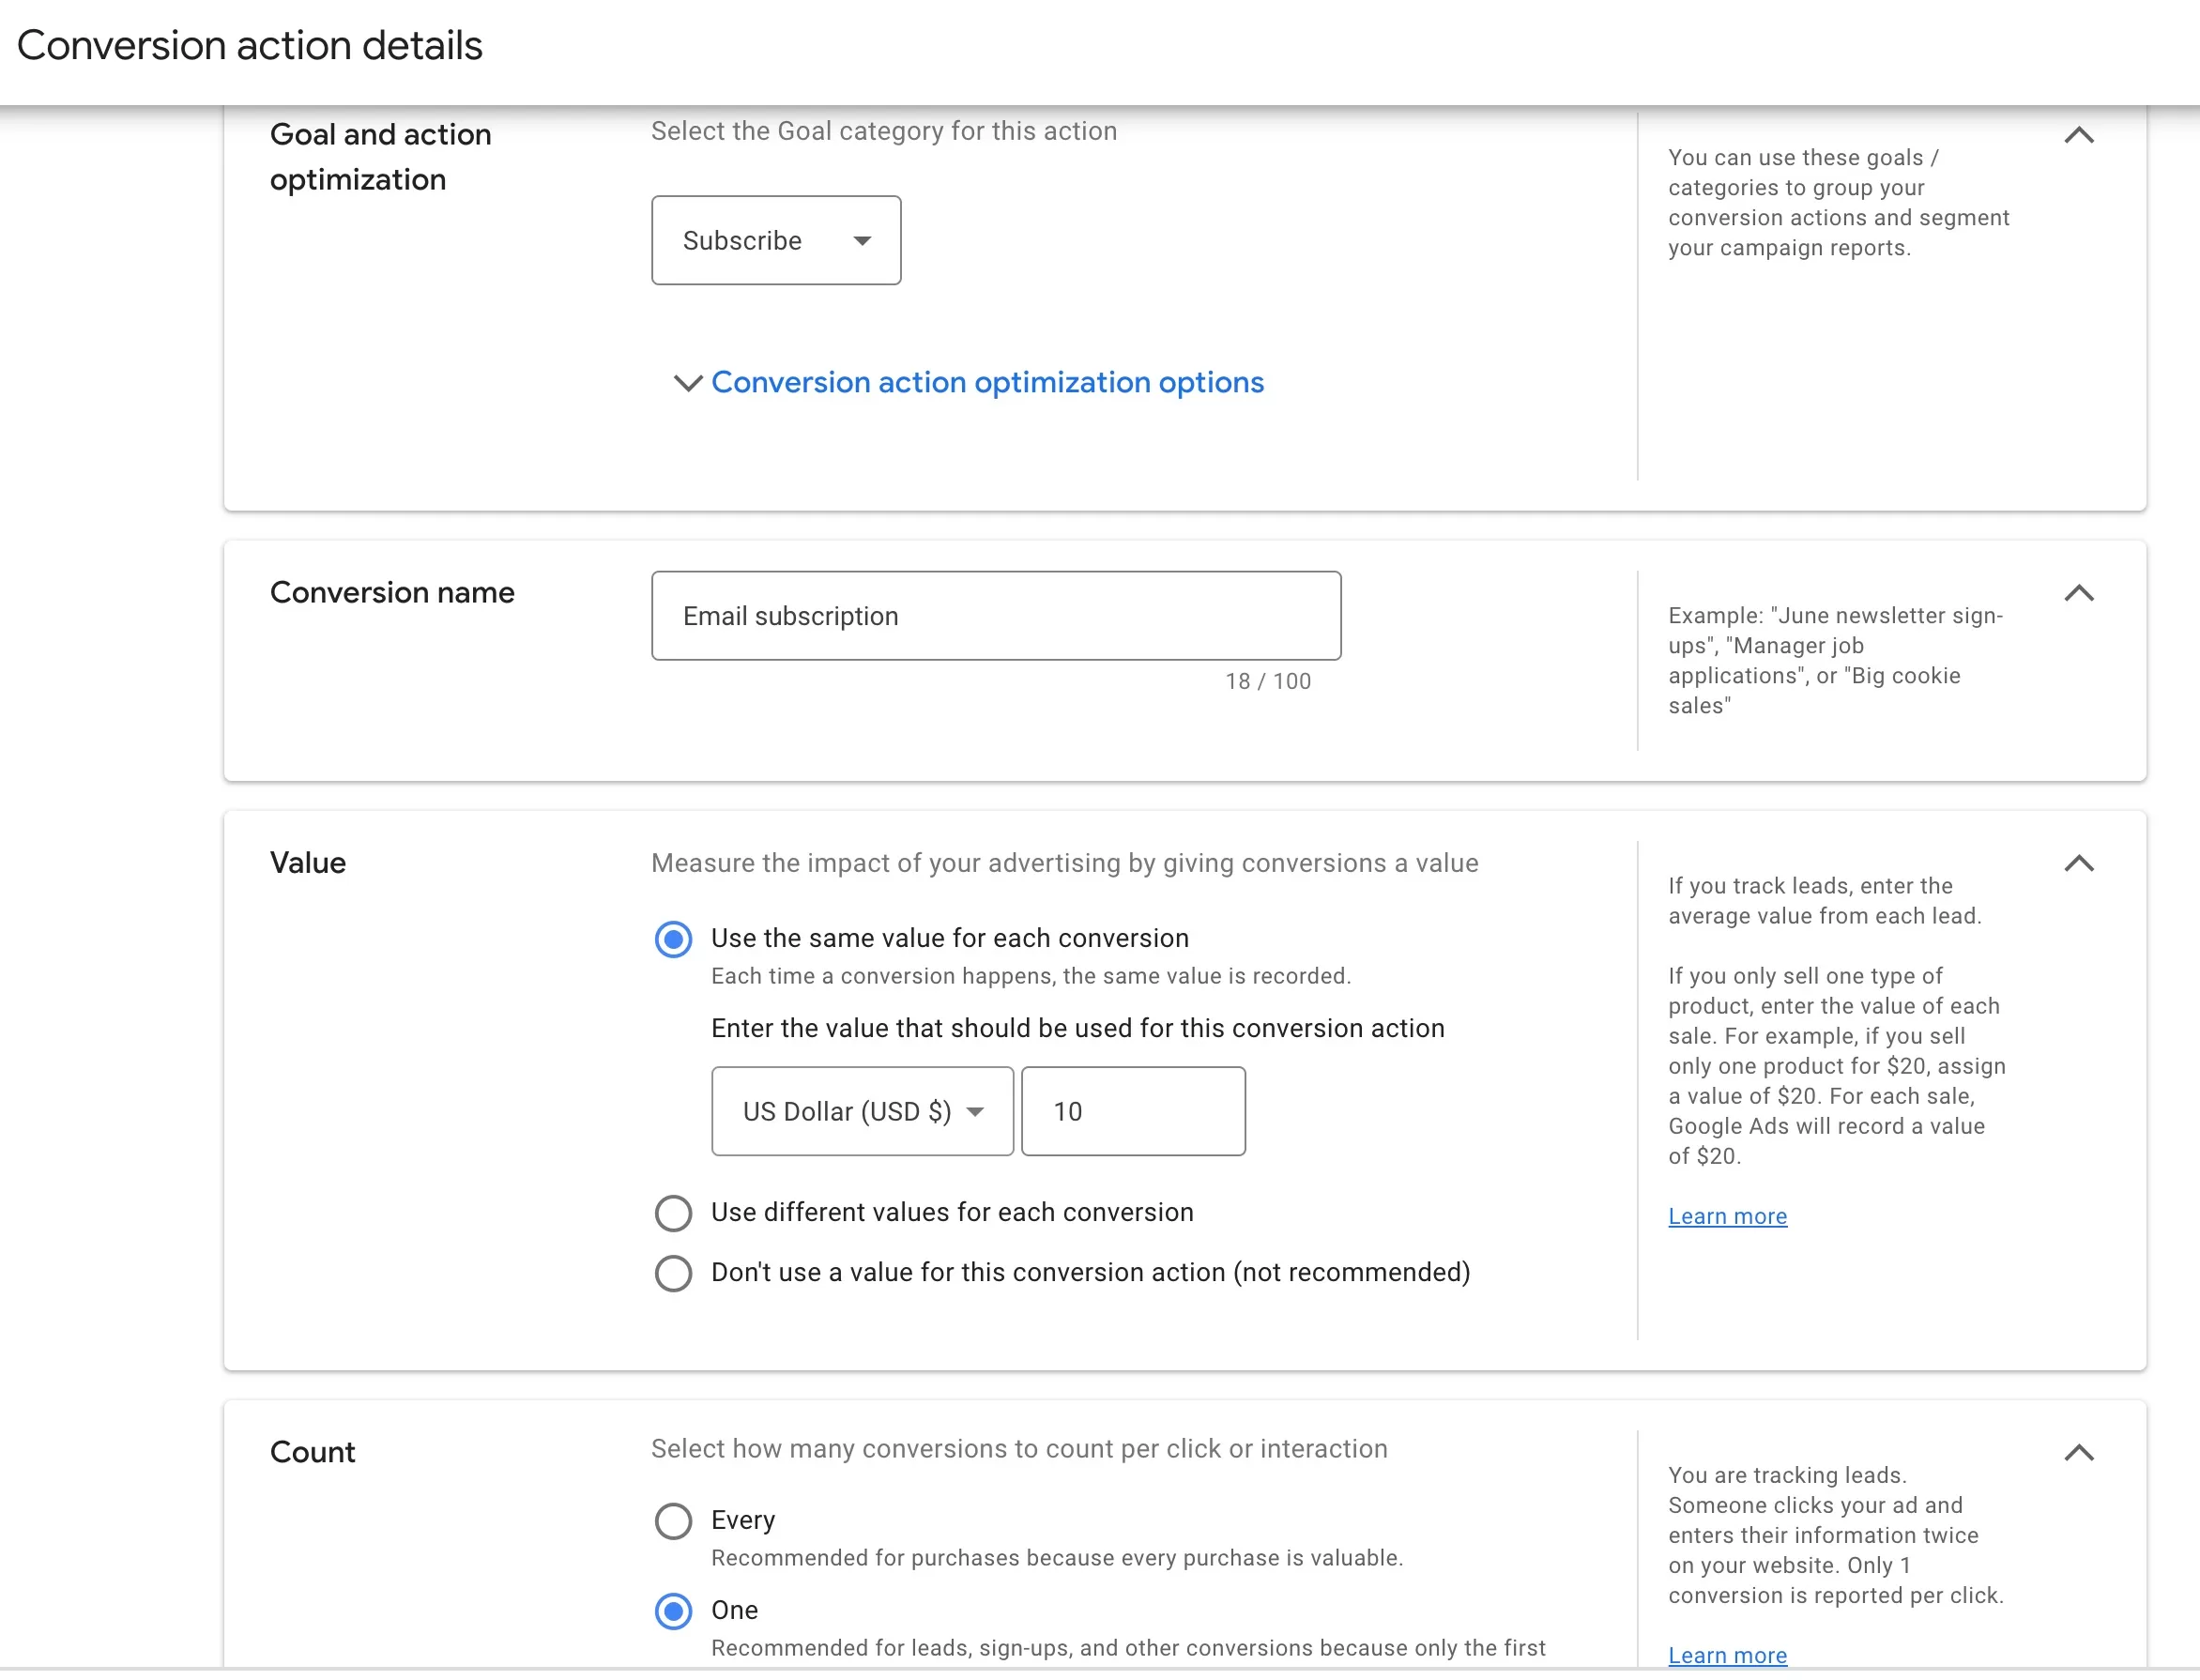
The drop down selection just specifies the conversion category. Does nothing for your campaigns, so select the one that is the closest to your action. In my case this is a Subscribe, because I will be tracking email subscribers.
But there is a blue drop down link, just bellow. Expand it.
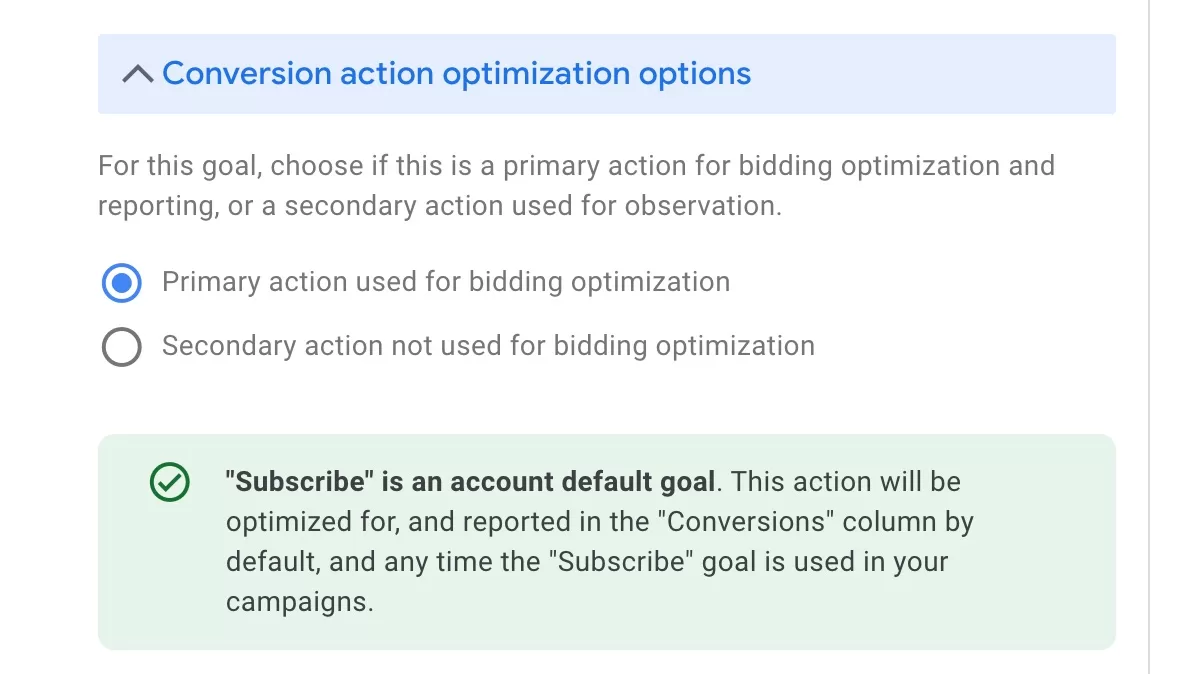
By default it is selected as Primary conversion and will be used for bidding and optimization. Primary conversions are your main conversions. The rest of the actions should be created as Secondary. Not to mess up your numbers and optimization.
Conversion name, anything you want as long as you understand what it is.
Value. This is how much on average value you think this conversion brings to your business. If unknown, leave $1. Otherwise you can calculate the average. I’m using $10, because I know this is how much value on average, each email subscribers brings within a year.
Count. In my case it’s one, as one user can subscribe once. If you have purchases on your site, you can leave every, as one user can buy several times.
The rest of the settings are a bit more advance, but you can leave default values for now. After you clicks save and continue, you will be taken to page that shows how you can add that conversion. We need the GTM one.

Click on it and you will be given instructions. You will only need to copy conversion ID and label. Keep that tab open and let’s head to GTM.

How to add Google Ads tag to GTM?
In the account click New. A tag configuration window will appear. Naming the tags is up to you, but I recommend having some rules on how you name them. For example “Conversion – Google ads – Email subscriber”. I name the action (conversion), then the platform or the source (Google Ads) and then he name of the conversion (email subscriber). It’s easier for me to see what the tag is all about. And if I have a lot of tags it’s easy to search.

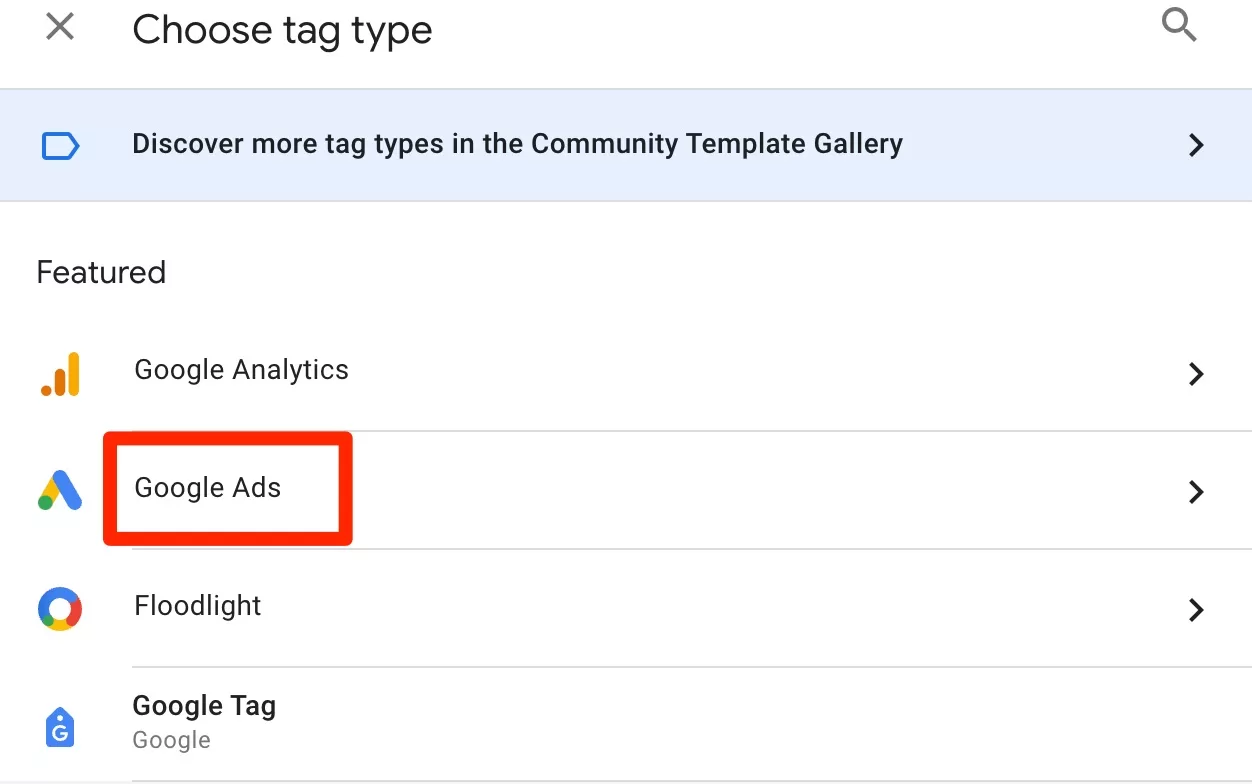
Click on Tag configuration. Select Google Ads from the list.
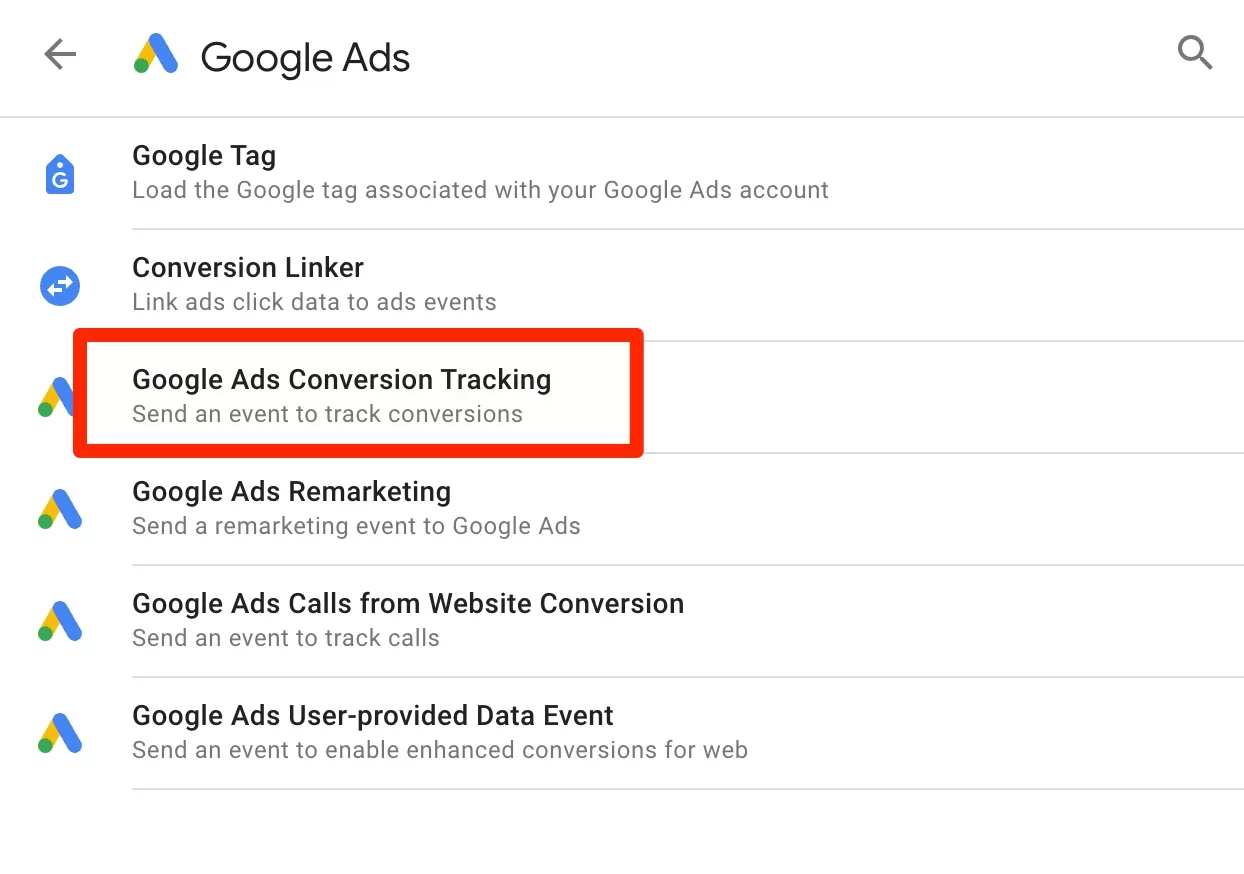
Then Conversion tracking.
Now you have to fill in conversion ID and label from your Google Ads account.

After this, scroll down and you will see a Trigger section. This is the rule that allows GTM to know when to fire (execute) that tag.

Ideally it’s a thank you page, where users are redirected after they sign up. In my case I have a page www.ppcdigest.com/thank-you-for-subscribing. And I can use it as a trigger. Which means that when a user lands on this page, this tag is fired and the conversion even is sent to Google Ads.
Click to choose a trigger, and then select a blue plus icon to add new.

You can create a trigger based on a lot of things. Including any events or clicks on your website. GTM is quite a powerful tool. I don’t want to go into all the features as this is not the goal of this post. But I will in the near future.
Let’s select page view as a trigger.

After selecting page view, you will need to specify your thank you page.
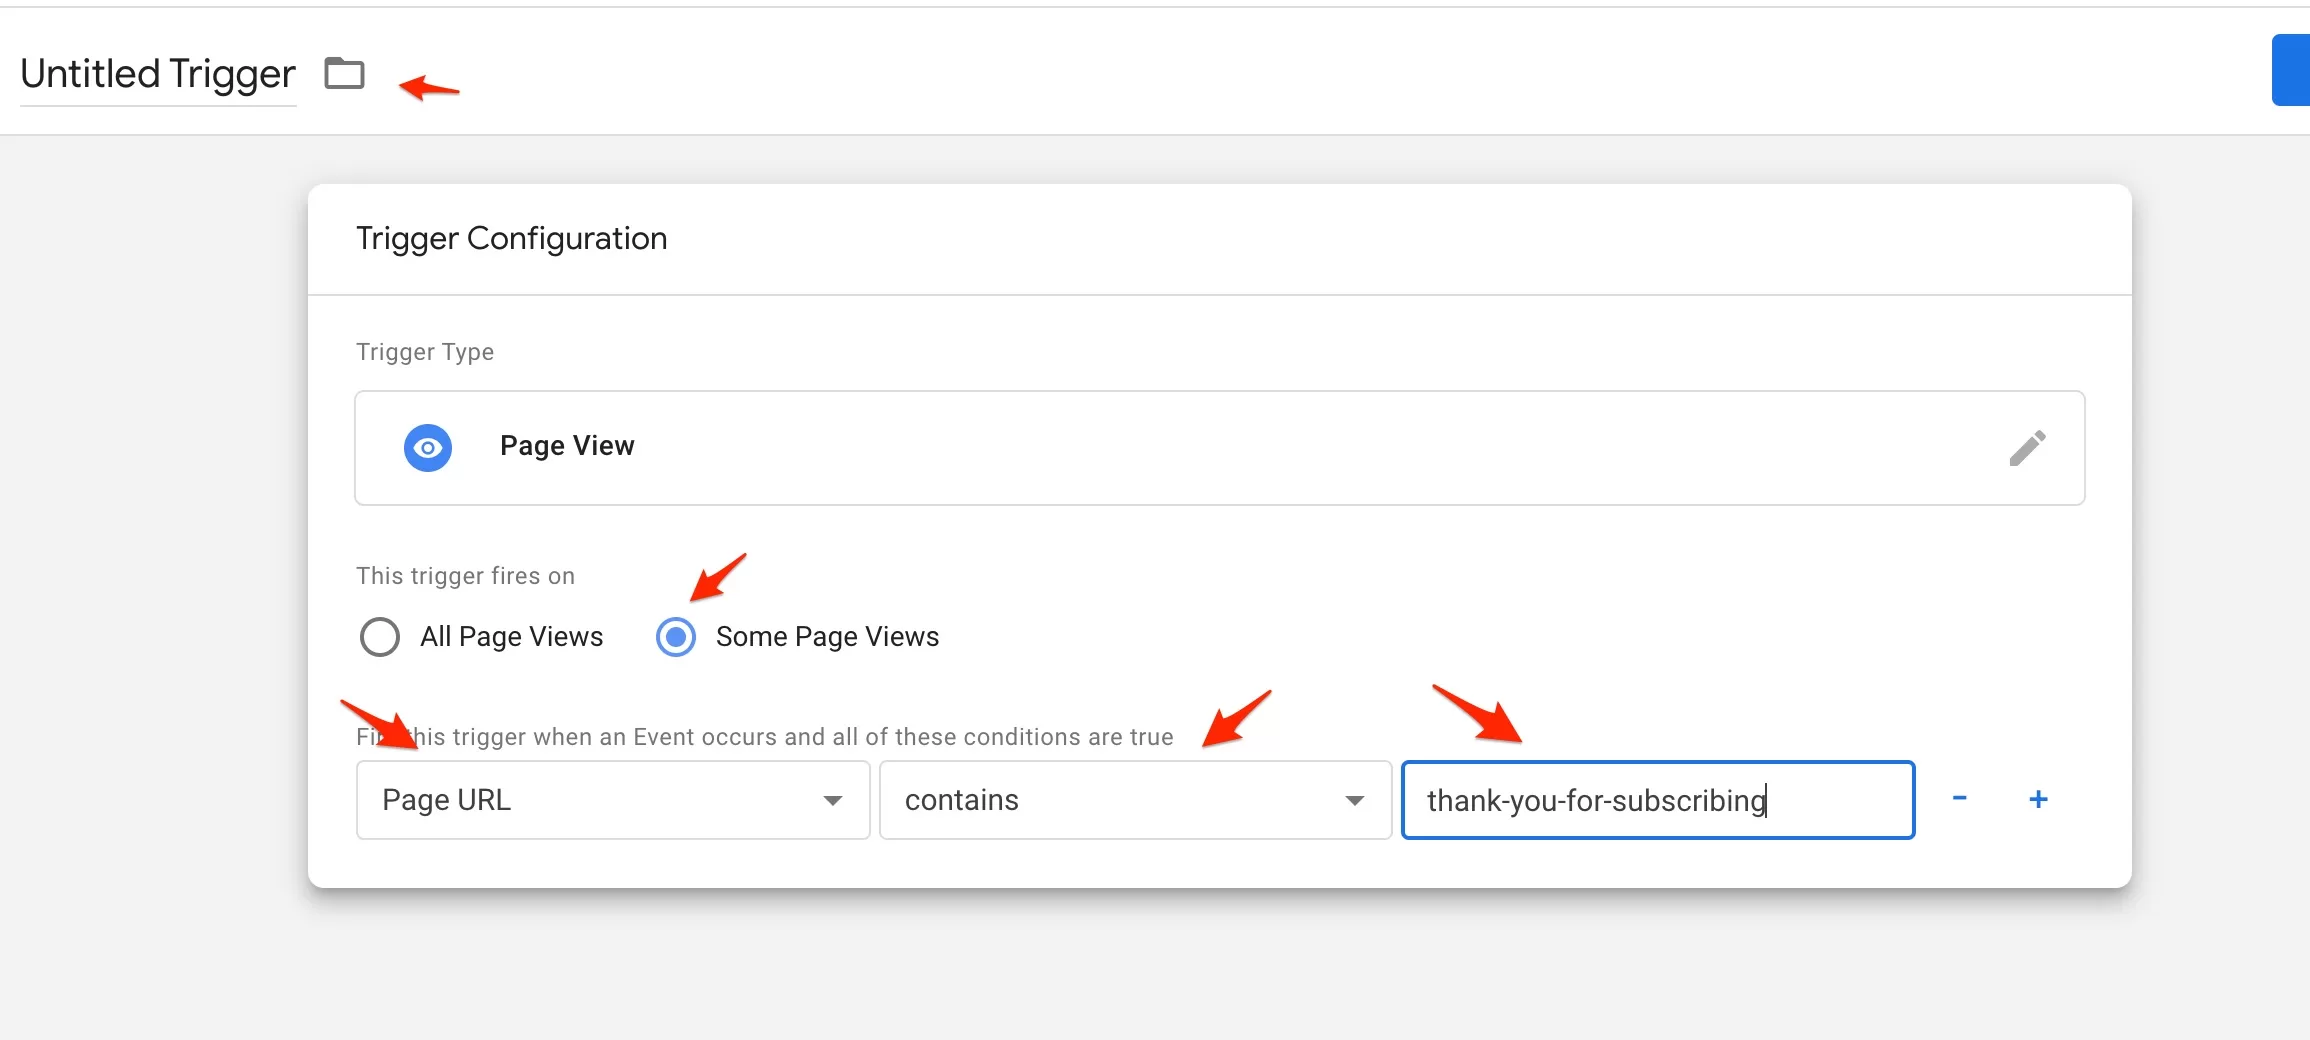
You have to name the trigger so you know how or when it triggers. Also, you can use the same triggers for many tags, you don’t have to create new ones. Then from the first drop dow select Page URL, then contains and enter your thank you page. Click save.
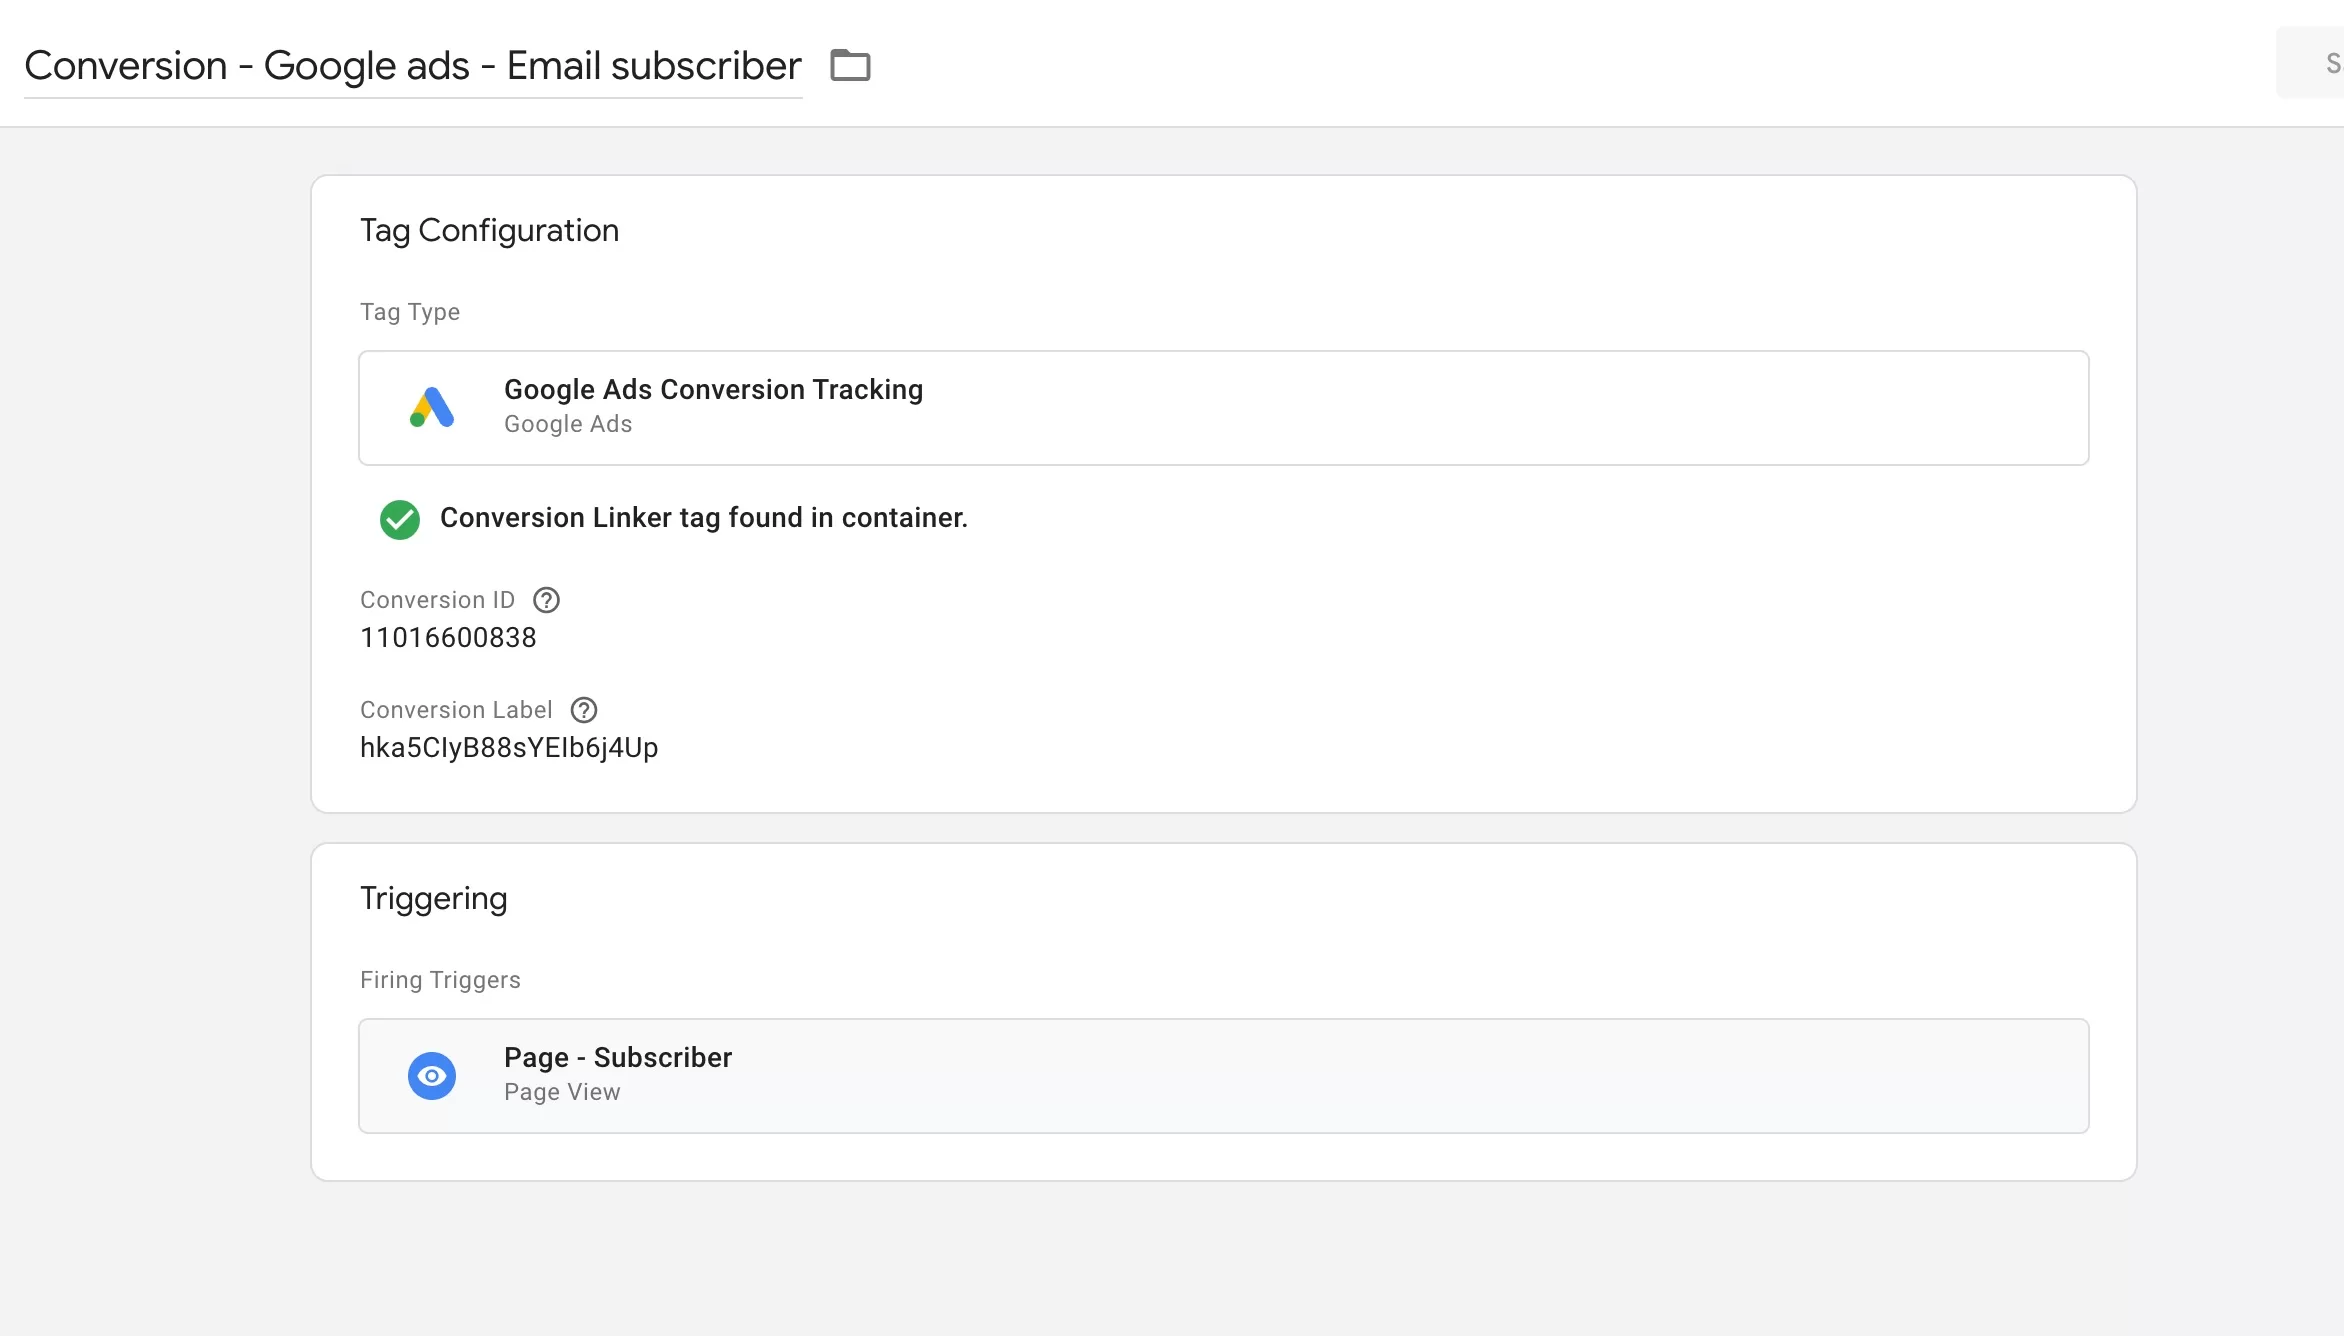
This is how a complete tag looks like:
Don’t forget to publish each time you create a tag or when you’re done creating many tags. Hit Submit and then Publish. Now your tag is live and should be working. I said should be, because now we need to test if it works.
Testing our implementation
When you’re in the main view, click Preview near Submit button. Google will ask you to enter your URL. It can be your website, or a specific URL. In my case it’s my thank you page.

Google will open another tab with your specified page and all the testing happens there. You should see a notification at the bottom that Assistant is connected.
Now get back to another tab which was opened, alongside your GTM tab. It’s where Google will show you what tags were fired.

At first, this all might be overwhelming. But you only need to know few things. On your left you see different events. Once you start clicking and navigating on your site, all of these events will appear in that left sidebar.
In my instance my tags were fired on Container load, which is when GTM was loaded. In your case it can be a click, a page visit etc. But you will have to go through those events on the left clicking them and see on the right which tags were fired. As you can see I have bunch of tags that were fired during this event, including my Google Ads conversion email subscriber.
And you can also see some of the tags that were not fired.
If you see that your tag was fired, then it should work. Check your Google Ads account after 24hrs and you should see numbers coming in.
GTM is pretty friendly tool, once you get the hang of it. But it does look intimidating at the start. I felt the same way and it even look a lot more “scary” back when it launched.
Adding Conversion linker
You might have notice a small notification asking you to add Conversion linker. This is important as Conversion linker stores click information from your ad. So you should always create it. And it’s very easy.
Click new tag, find Conversion linker set a trigger to fire on All pages.

No additional set up needed.
How to create Remarketing tag in Google Ads?
Another popular tag that you should create is the remarketing tag. It allows you to run remarketing campaigns in Google Ads. This is where you show your ads to people who have been on our website.
Go to your Google Ads account, click Tools and Settings, the Audience manager. You might see a list of audiences, but click on Your data sources.

Find Google Ads tag and click on details. Scroll down until you see tag setup instruction. Notice it only has Conversion ID.

Now head to GTM, create new tag and select Remarketing. Enter conversion ID.

As a trigger, select All pages. Save the tag and Publish it. You will start collection your audience and will be able to target them in your campaigns.
Should you importing conversions from GA4 or use Google Ads conversion?
There is no golden rule, so it’s up to you. I use both, import conversion from GA4 and use the same conversion created within Google Ads account. But have in mind, that those two conversion events are counted differently. So your numbers will not match.
Also, if you have the same conversion but different source, one being imported and the other created within Google ads, select only one as a Primary conversion, not both. I recommend using Google Ads conversion as Primary and GA4 imported conversion as Secondary. Mostly, due to attribution and Google Ads machine learning.
By default GA4 uses the Google Paid Channels attribution, where conversion credit is given to Paid channels. Google Ads uses last ad click attribution. But that could be changed to data-driven attribution. If you’re not familiar with attribution models, I bet this doesn’t help you in any way. Just ignore it and stick to default. Then a conversion created through Google Ads account will be more biased towards ad clicks. GA4 conversions will be spread out through all your channels (including Google ads).
This is why you see less conversions in GA4 from Google ads.
Google Tag Manager (GTM) for Google Ads: key points
- GTM is a free tool from Google that allows the addition and management of marketing tags (code snippets or tracking pixels) on websites or mobile apps without modifying the code.
- Useful for businesses without an in-house developer, as it saves time and money.
- Simplifies the process of adding tags to a website by allowing users to manage them in one place.
- Reduces website slowdown that can occur with multiple code snippets.
- To create a GTM account you need a Gmail account.
- GTM accounts can manage multiple containers (websites), simplifying management for users with multiple sites.
- Each published version in GTM should be named for easy identification.
- GTM allows reverting to previous versions, useful if new additions cause website issues.
- Create conversion in Google ads and then create a tag in GTM. Don’t forget Conversion Linker.
- Always test your set up with Preview mode, before publishing.
- And don’t forget to publish your changes!