Google Ads Assets, formerly extensions, are a great way to boost your campaign performance. A few years back, when Google wasn’t so pushy with its Optimization score and Recommendations dashboard, only a handful of people used assets. You can say Google did a good job at promoting assets so that people find them and add them to a campaign. But it does not end there.
Even if people somehow added them, there are many who don’t look at what Google suggests ( and usually for a good reason). And probably more people know exactly how assets can impact their campaigns, how to create them and what are the best practices.
Let’s remedy this, shall we?
A while back, I mentioned assets in this post where I wrote how a tested a promotion asset (recommend reading it, by the way), and I said I will write a separate post about assets. So here it is.
What are Google Ads Assets?
We know that search ads have a symbol limit for the headline and description. Meaning that you can’t put all the information that might be useful in the ad. Google also knows that. And several years ago introduce extensions. It’s like a piece of information that you can add to your ads, that enriches it.
Here we have an ad that has a few assets.

Ideally assets not only add additional information but helps to increase clicks as the ad becomes more informative, hence more attractive. But Google also introduce a plot twist. Those assets don’t appear with every ad, every time. It all based on ad rank. And I will explain it in detail further down the post.
There are 12 currently available assets to add. From links to pages or categories, your phone number and location to forms and images. Today assets can really enrich your ad. So that is the reason you should always have them.
Depending on the account and the country you may add these assets:
- Image
- Business name
- Business logo
- Sitelink
- Callout
- Structured snippet
- Call
- Lead form
- Location
- Price
- App
- Promotion
Recently I saw these two as beta. This is something Google is trying out.
- Headline
- Description
I haven’t tried them out yet. But according to Google these campaign level headlines and description are just like Search ads. You can associate them at a campaign level and both headlines and descriptions you specified can appear in all ads of that campaign. The reason you might use them is to communicate something of importance across all your ads, without having to edit each of them. Also, since these assets can be scheduled, you can control when those headlines appear in the Responsive search ads (RSAs). This could be great for a promotional message. Additionally, these assets can be pinned to certain positions if you want to ensure they show.
Google allows you to associate up to 3 headlines and 2 description assets at the campaign level. These assets will be applied to all enabled RSAs within the campaign.
By the way, there’s no cost to add additional assets to your campaign. Clicks on your assets will be charged as usual (except clicks on seller ratings). Google Ads charges no more than two clicks per impression for each ad and its assets.
When Assets show up with your ad?
I’ve mentioned that not all assets are shown all the time. In fact, your ad might not have assets at all. This depends on various reasons. In general Google selects which of your assets should be shown with each search on Google. That’s why you need to create all of them and leave Google decide what to show.
For your asset to show up with your ad if:
- The asset is predicted to improve your performance.
- Your ad’s position and Ad Rank is high enough for assets to show.
AdRank combines your bid, the quality of your ad and landing page, Ad Rank thresholds, context of the person’s search, and expected impact of assets and other ad formats. Google Ads requires a minimum Ad Rank before showing additional assets with your ad. What it means is that, you may need to increase your bid or your ad quality (or both) in order for your additional assets to show.
The position of your ad on the Google search results page. Assets show up only if your ad is in the top 4 positions, as there is limited space above search results. Ads in lower positions generally will have fewer assets added than ads in higher positions. Plus, the Google Ads system generally won’t allow ads in lower positions to get more incremental clicks from assets than the incremental clicks they’d get from moving up to a higher position. To show ads in higher positions, generally you need to increase your ad quality, bid (no surprise here), or both.
Other assets you’ve enabled. That’s why you have to create as much as possible (but relevant to your business). In each auction Google will show the best performing assets.
Why you should have Google Ads assets?
Ad assets helps you improve your ads success. If your ad is eligible to show assets, it will look a lot more different compared to others. Does that guarantee more clicks and sales? No. But it does increase the chance.
Essentially it enhances your ad. Be it just a phone number, location or pricing table, it helps the user to see more stuff with your ad. Since you have only 3 headlines and 2 descriptions showing at the same time, assets allows you to show more information which can attract user to click.
So we have:
- More information which makes the ad stand out and possibly get a click
- Improved click quality. If you have more information present, there is a chance that people will see all the information they need right away. Hence you’re filtering out unnecessary clicks.
- Better ad ranking. One of the ranking factors is expected CTR, which usually increases with assets present. So just by having them will automatically improves your ranking.
- Reduce your spend. Since most likely your CTR will increase, followed by Quality Score, your CPC might go down. And you can get more clicks for the same budget, or use that extra budget elswhere.
How do you create Google Ads assets?
All assets are in the same place and the process is similar. You have to go into a campaign, and the go to Ads and then Assets. What is confusing that they are called assets (previously extensions) but for some reason the drop down (marked) says Associations. But you get used to it. Google changes things and renames stuff constantly.
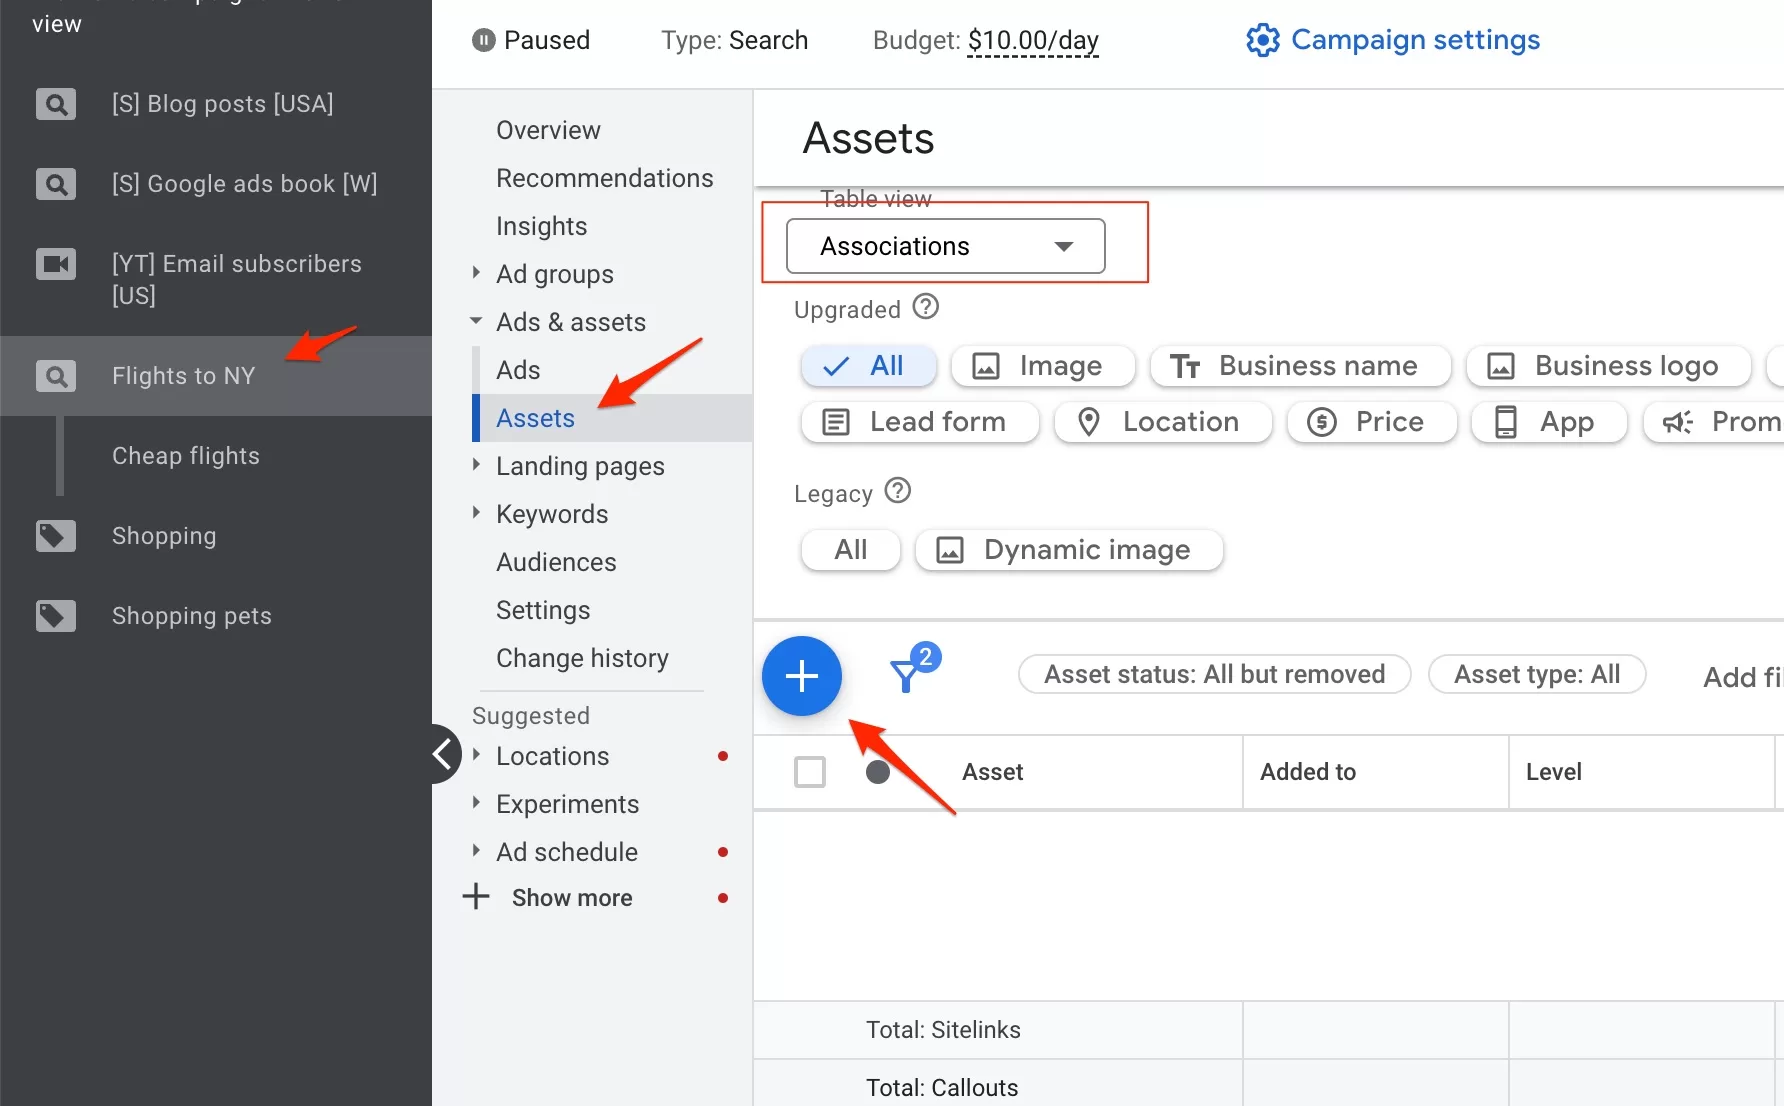
If you press the blue button it will give you a drop down of all available assets in your account. Select the asset you want and input require information. Now you know where to find assets and how to add them. Let’s look closer at each assets what what you need to know when creating them.
Sitelinks
This is the most common asset. It’s basically adding additional links to your ad, enriching it, and helping users find what they are looking for.

When creating site links I recommend having 4-6 in the campaign. And although you can create them on the ad group level as well, in the beginning, I would recommend just staying at the campaign level. When you are more familiar with sitelinks you can then decide to have totally different ones for each ad group and not only the campaign. This just takes more time and a bit more planning.
The best way to think about site links is like an asset of the theme of your campaign. So your campaign is about women’s clothes, try to ad site links that are about that category. Like adding links to shoes, shirts, skirts, jeans, and so on.

As I mentioned you can add them on a campaign level, ad group, or event account level. In the beginning, I would suggest using only the campaign level.
The site links are just that, links. You add a sitelink text, add a few lines of description (recommended) and input the URL. Similar to ads, but simpler.
Once you create a sitelink, you don’t have to create the same sitelink again. It will be available from the dropdown if you select Use existing, instead of create new.
Note that descriptions are not always visible. It depends on a few factors including your ad position. So don’t be surprised if you don’t see them, but I would recommend adding descriptions all the time.
Callouts
Use callouts like short promotional phrases. Like “Free Shipping”. It can say anything you want, but obviously don’t lie.
They appear right here and as you can see make an ad look bigger.

Similar to sitelinks I recommend adding them to the campaign level. Unless you have only a few campaigns and there is no point in having different callouts for different campaigns then you can have it on the account level. In this case, all your campaigns will have the same callout asset.
Once you click add new, you will see this:

Callouts have a symbol limit so usually you try to write something that applies to your whole account. Like “Free Returns” or “30-day money-back guarantee”. Most advertisers write their benefits, but you can be as creative as you want. As you can see from the right preview, Callouts appear after your ad description.
App assets
This is only good if you have an iOS or Android app to promote. And the asset just requires you to add a link to the app store and that’s it. All the information is pulled from the store. You can only add a CTA, which in my case is “Download now”.

So if you do have an app this is a great way to get more exposure. But it only shows on mobile devices.
Price
Price asset is excellent if you advertise a business with pricing plans. This gives you the opportunity to showcase them all, including a free plan if you have one.
You see here first plan and then a small drop down that reveals more.
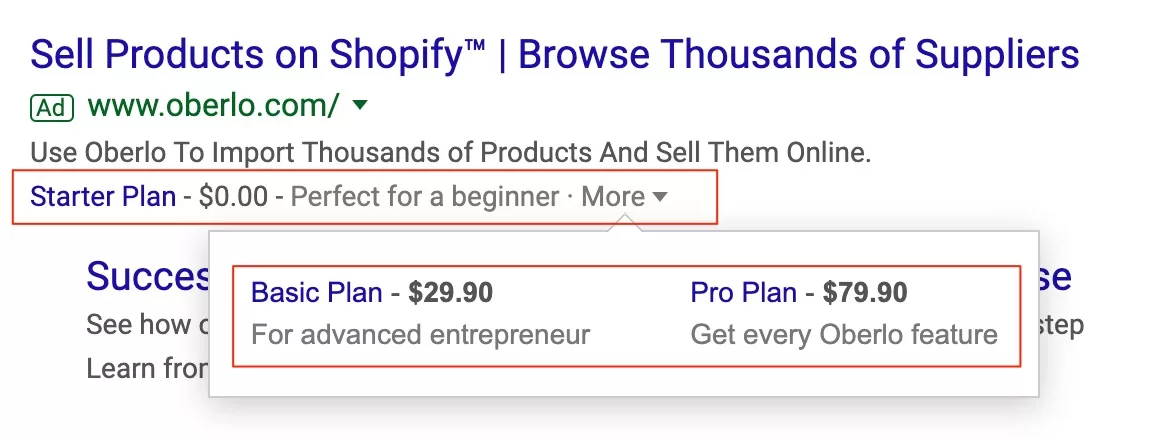
You can use price asset for any business, but it can’t have just one price tier, so it has it’s limitations.
Price asset has a bit more options.

You will have to select Product tiers, like services (gearbox repair, windshield change) or product categories (baby strollers, diapers, etc.)
And then you have to select a Price qualifier, like “from” or “up to”. Below you have to specify the price, add a description, and a URL.
If you are advertising service pricing plans and all of them are on the same page, it is fine to specify the same URL for all the assets here.
Obviously your currency and the price it self. And you’re set. As you will find out it is not supported in all countries. So if you can’t see your currency in the drop down, most likely it won’t be approved. I did, however, had some luck, passing through Google’s eyes with the US currency and English language for the country that does not support it. But not for a long.
Promotion
Promotion assets are designed for you to use for specific promotions. Be it New Year’s, Mother’s day, or Back to school. It can even be your ordinary sale.

Google gives you a list of almost all occasions. You just have to choose one or neither.
You can also choose if it’s a percentage or monetary value and many more options.

What I like is that you can wither specify the promotion code in the text or have it on the website. And the best part is that you can schedule promotion assets to appear on a certain times. Less management.
Image
This asset allows you to have an image near your ad. Although there are many requirements for the image itself, it is still worthwhile as it does make your ad stand out.

You might see images near organic search results as well. So it’s the same with ads. And in the example above you see how it makes the first ad way more noticeable than others below it.
Adding images is the same as in Responsive display ads. You upload your image, you crop it according to Googles’ specification and you’re done. Since the images appear, make sure that you use high quality and focused on one single object (product, person). If there are too many elements in the image they just won’t be visible.
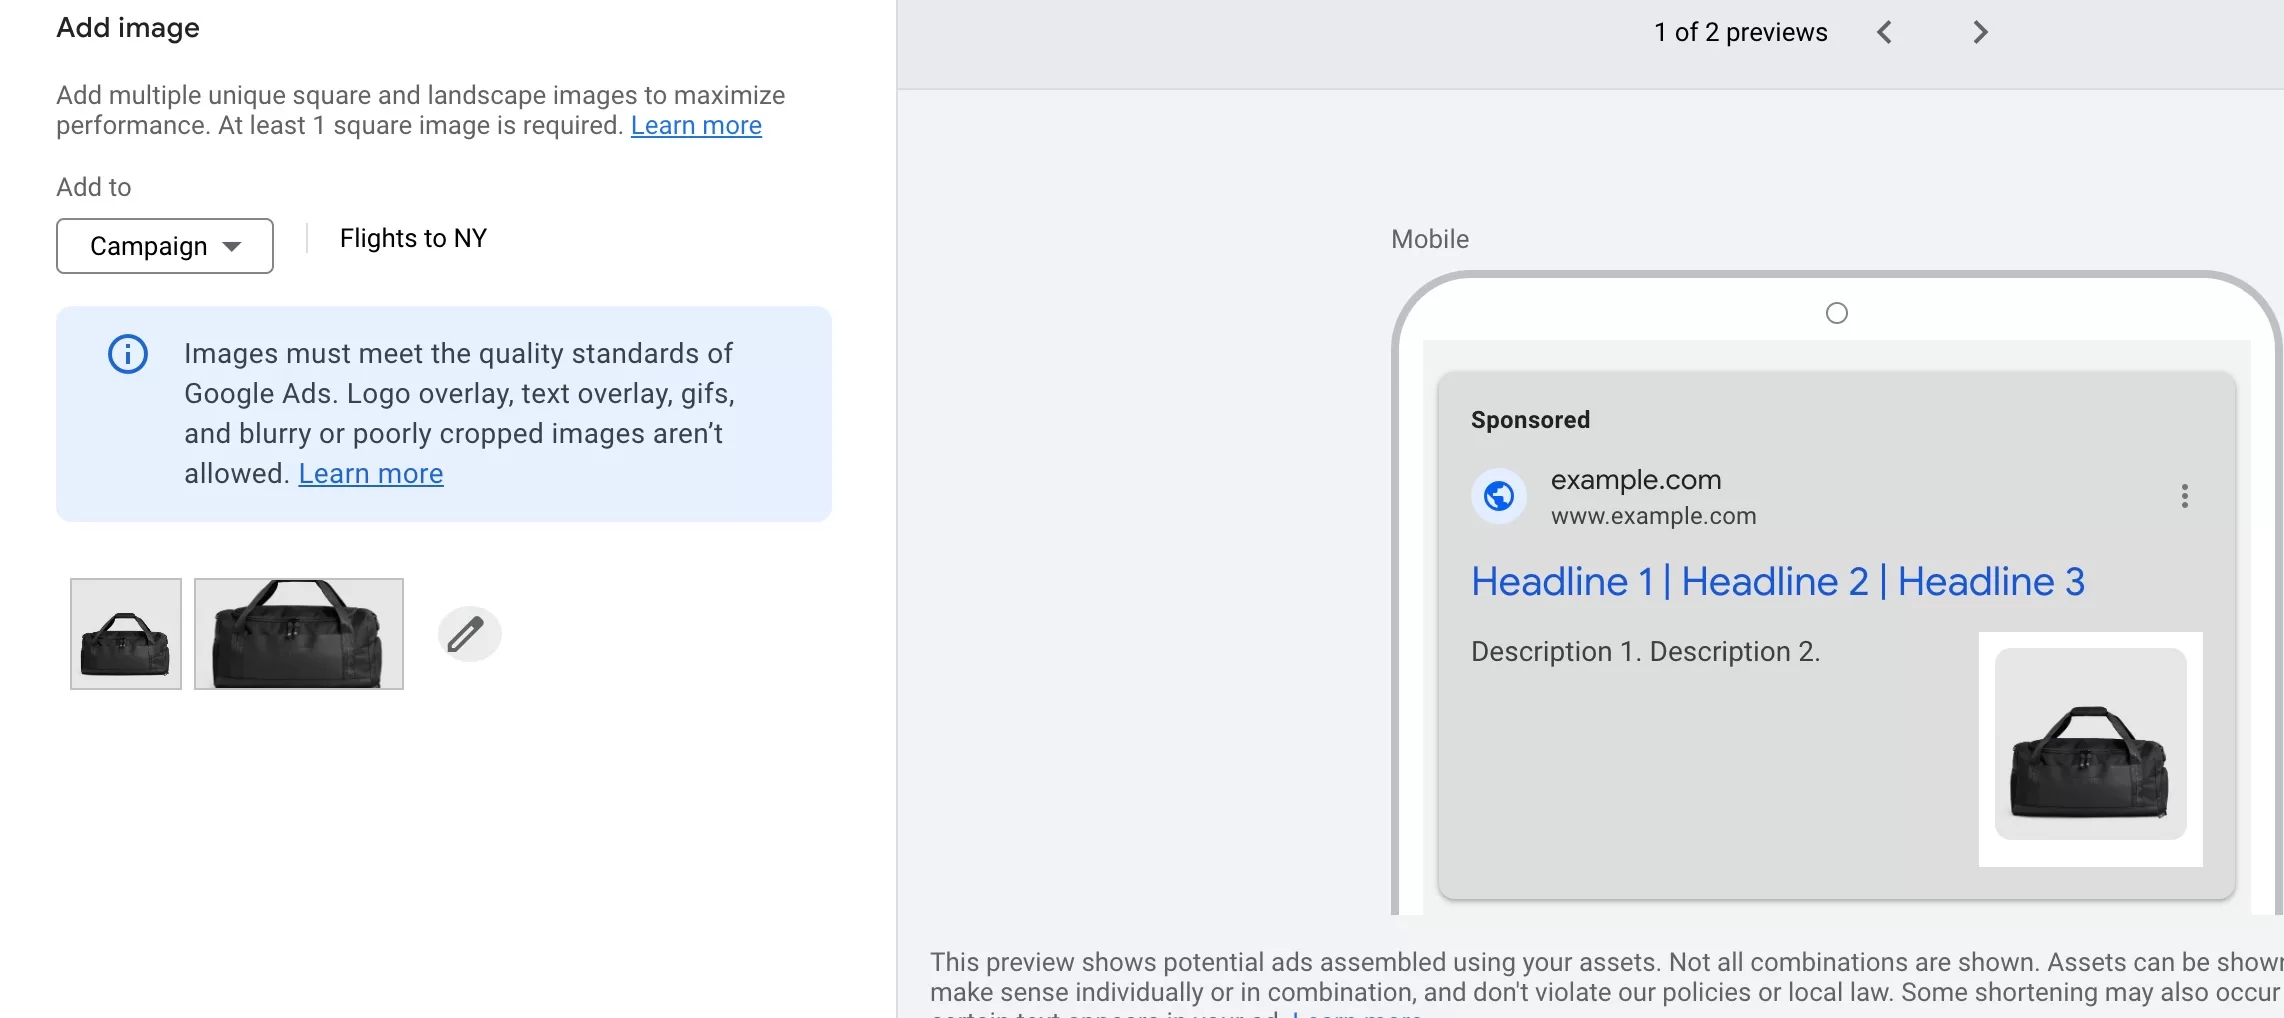
You can add several images and just leave them and decide later when you see the results.
Structured snippet
Structured snippets are also very useful if you want to enhance your ad with additional information. Google give you several categories to select from. All of them are self-explanatory and only good with specific campaigns. For example, if you’re promoting educational business you might use the Degree programs asset to list your programs.
For e-commerce store, you might add styles:

Select a category that fits your business, otherwise it might not make sense for the user.

More often used categories are brands, styles, and types. But you will have to decide which ones are suitable for your campaigns. And business.
Make sure to select the right language and category. The list whatever you need as values. On the right you see how they will look in the ad.
Call
Probably the easiest asset. It’s just your phone number in the ad.

Usually, you can have it on the account level as most small to medium businesses have one general business phone number. Of course, you have to decide if the phone number should be advertised at all. Don’t create call asset just for the asset it self. You can use other assets.

But in case you have a local office in different countries or states you can have this asset on the campaign level, and then adjust to a particular location.
The biggest benefit is that a user can click to call on the ad if it contains a Call asset. Very convenient if most of your business is conducted via phone.
Depending on the country you might have call reporting turned on. In that case you can also select your conversion. Usually it will be “Calls from ads”
Lead form
This asset allows you to collect leads without directing users to your website. When you click on the asset in the ad a small form appears and users can fill it out, without leaving Google search results. This is very convenient if your business is all about collecting leads.

If you ever saw or created a any form, it will be a peace of cake to create this asset as well. When you click create, you will see a selection of fields you can use:

It’s up to you to decide what information you need from prospective customers. But the more you ask, the less likely users are going to fill out the form. Make sure you only ask for vital information.
You can also notice, that near some fields it says “pre-filled”. This means that this field can be pre-filled by Google if the information is known.
Although the call to action has a limited selection, you can add additional text just below it.
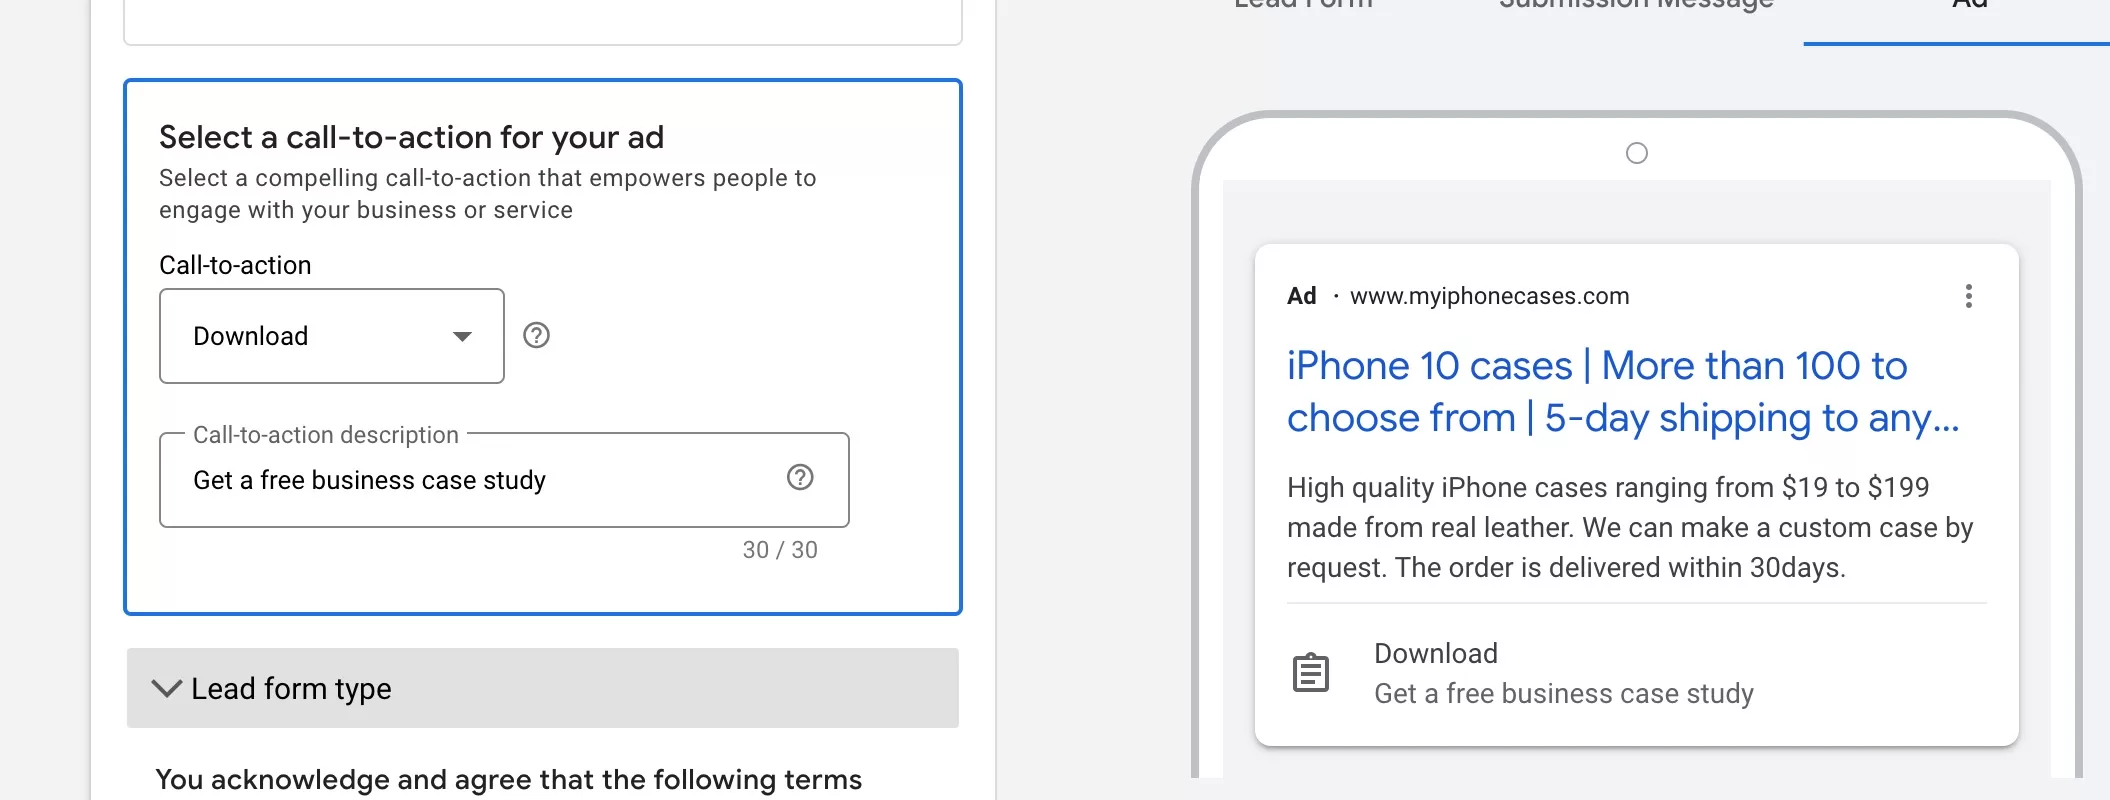
This is not a widely used asset. I’ve used it once as a test, wasn’t anything special. Usually the business wants people visiting their landing page and filling out the form there. But it might be useful f a business does not have a website, or a form on the website and wants to collect leads.
Location
Location asset is designed to show your location address in the ad. Obviously, not all business would want to display that. But if you have a local barber shop, you probably want your location in the ad.
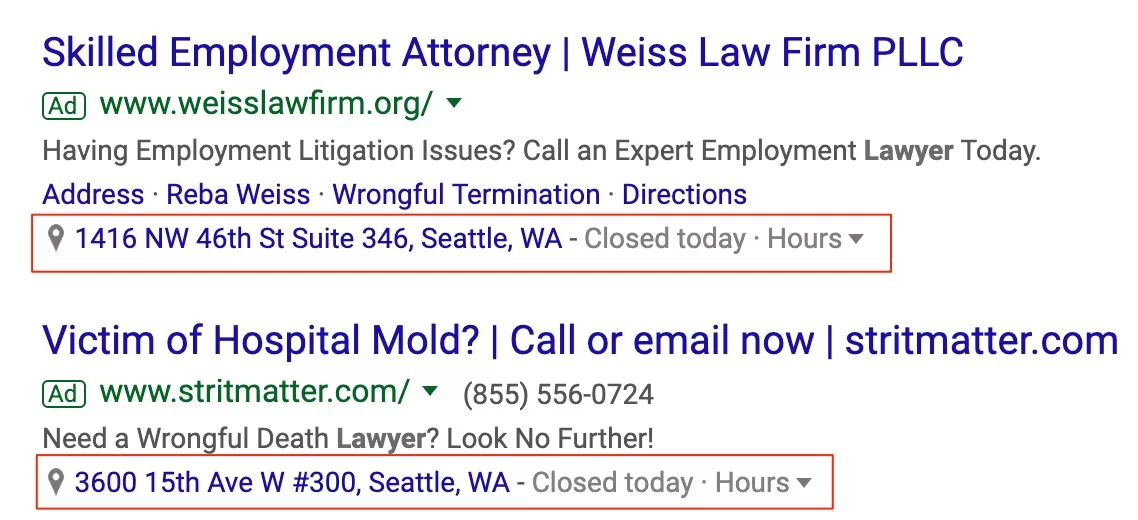
If you want to show your business location, all you have to do is link your My Business account to Google Ads. Obviously first you need to have my Business account which is free to set up https://www.google.com/business/
Once you link your accounts, you will see your address in the drop-down when creating this asset. No other inputs are required.

Again, you can have several locations, in which case you will probably want to add them at a campaign level if your campaigns are based on different locations, like States for example, or countries. Otherwise, just have an asset on the Account level.
Remember, that location assets are not always shown as this depends if Google knows users’ location to make it relevant to the search results.
Business name
It’s your business name that appears near the ad like here:
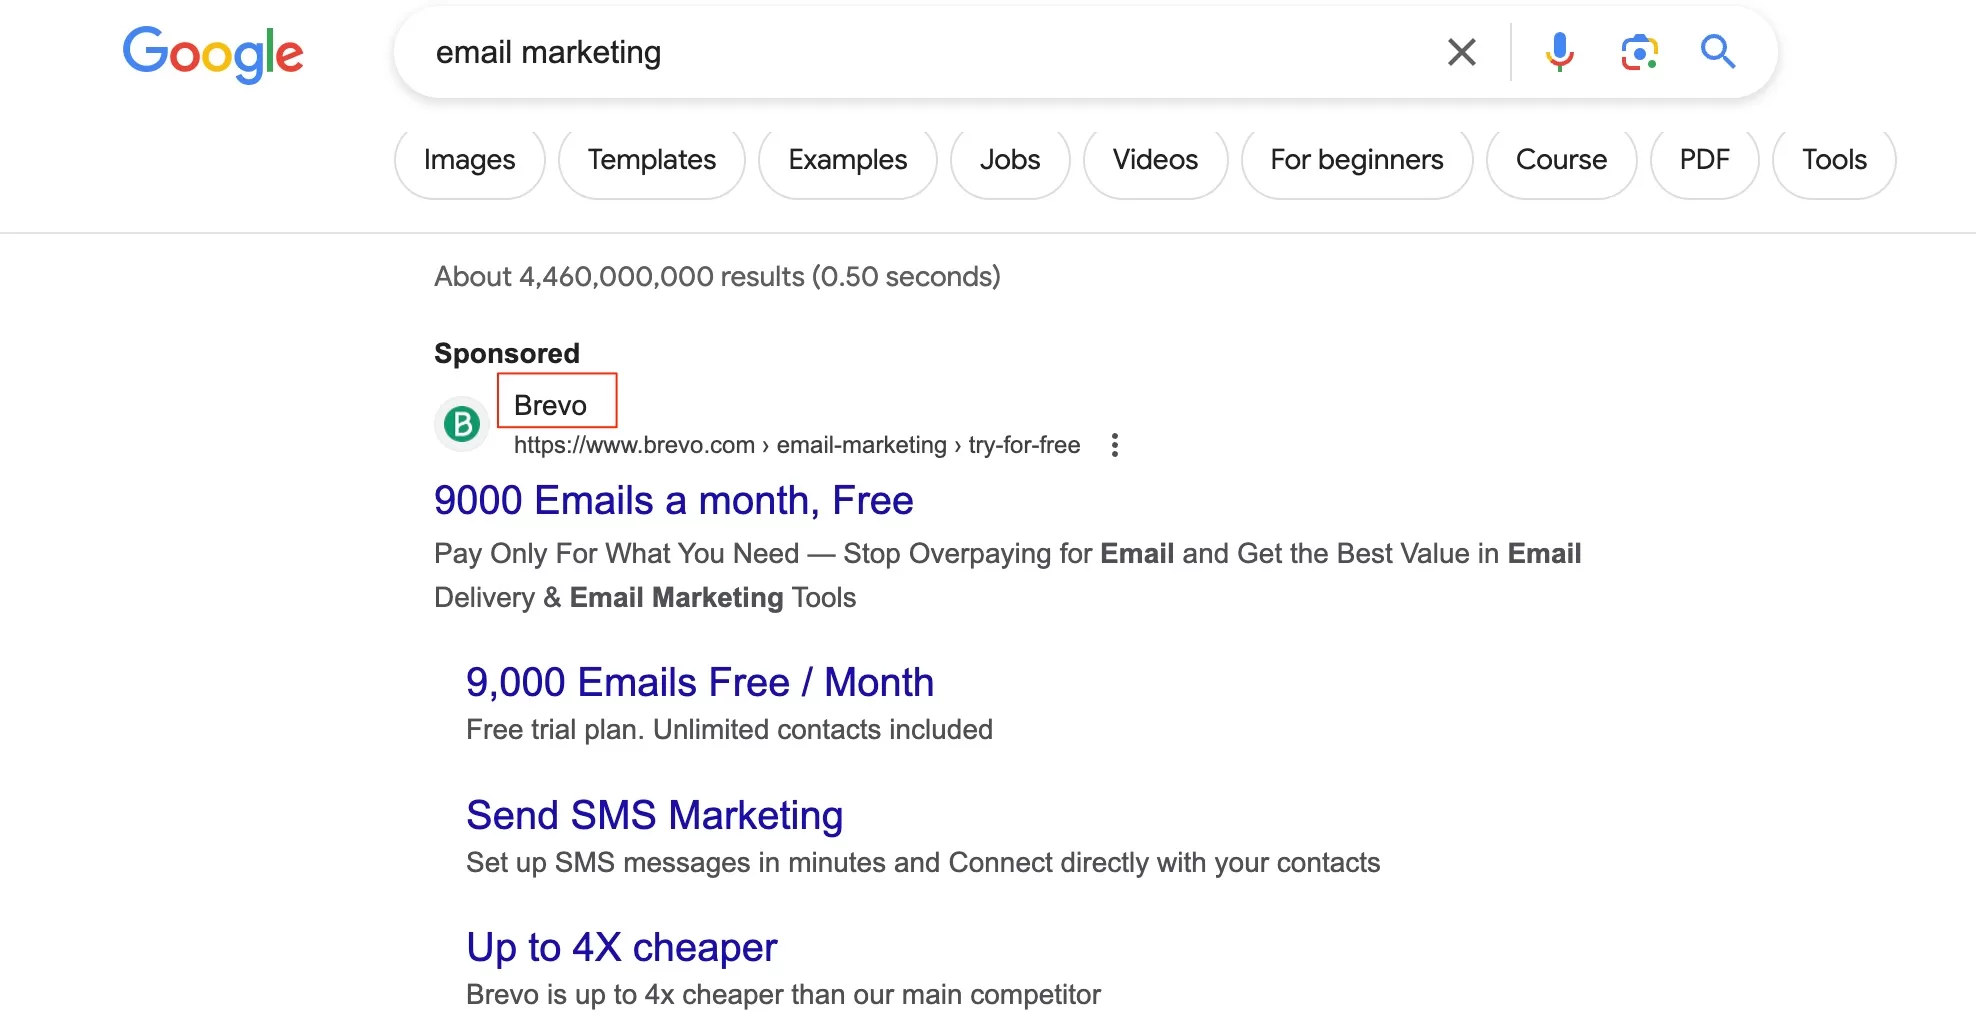
Maybe it doesn’t seem like a lot, but it does make a difference. To me personally the ad looks more professional with the company name in the ad.
It’s quite easy to add it.

But you will have to complete Advertiser verification process. And once you’ve done it your name has to match the name you used to verify your account. Just like with other assets Google does not quarante that your business name will be shown even though you competed your verification.
You can have only one business name in your account.
Business logo
Business logo is basically the same as the name. You upload the logo and it appears in your ad instead of the default icon.

Just like with business name, you can have only one logo. Make sure it is clearly visible and fits. This is a small downside as your logo look best if it’s square. If you have a long logo then it might not fit and therefore can be rejected. In some instance you can use just a symbol instead of the whole name.
This is what I mean. My logo is just the name and it does not fit into square. I could try using just the PPC part. Or maybe just the circled graph icon.

Once you add the logo it won’t appear immediately. It will take some time for it to appear. Don’t be alarmed just give it some time.
Where to find asset performance?
After you create your assets, Google will have to approve them. So it might take some time. Also, your assets have to be eligible to be shown. So if your spend is not high or you have low quality ads, you might have to wait a while for the first statistics to appear.
To see how your assets performing, you have to go to the same place where you created them. You can visit weekly to see if your assets are eligible and have any statistics.
Depending on your assets you might see something like this:
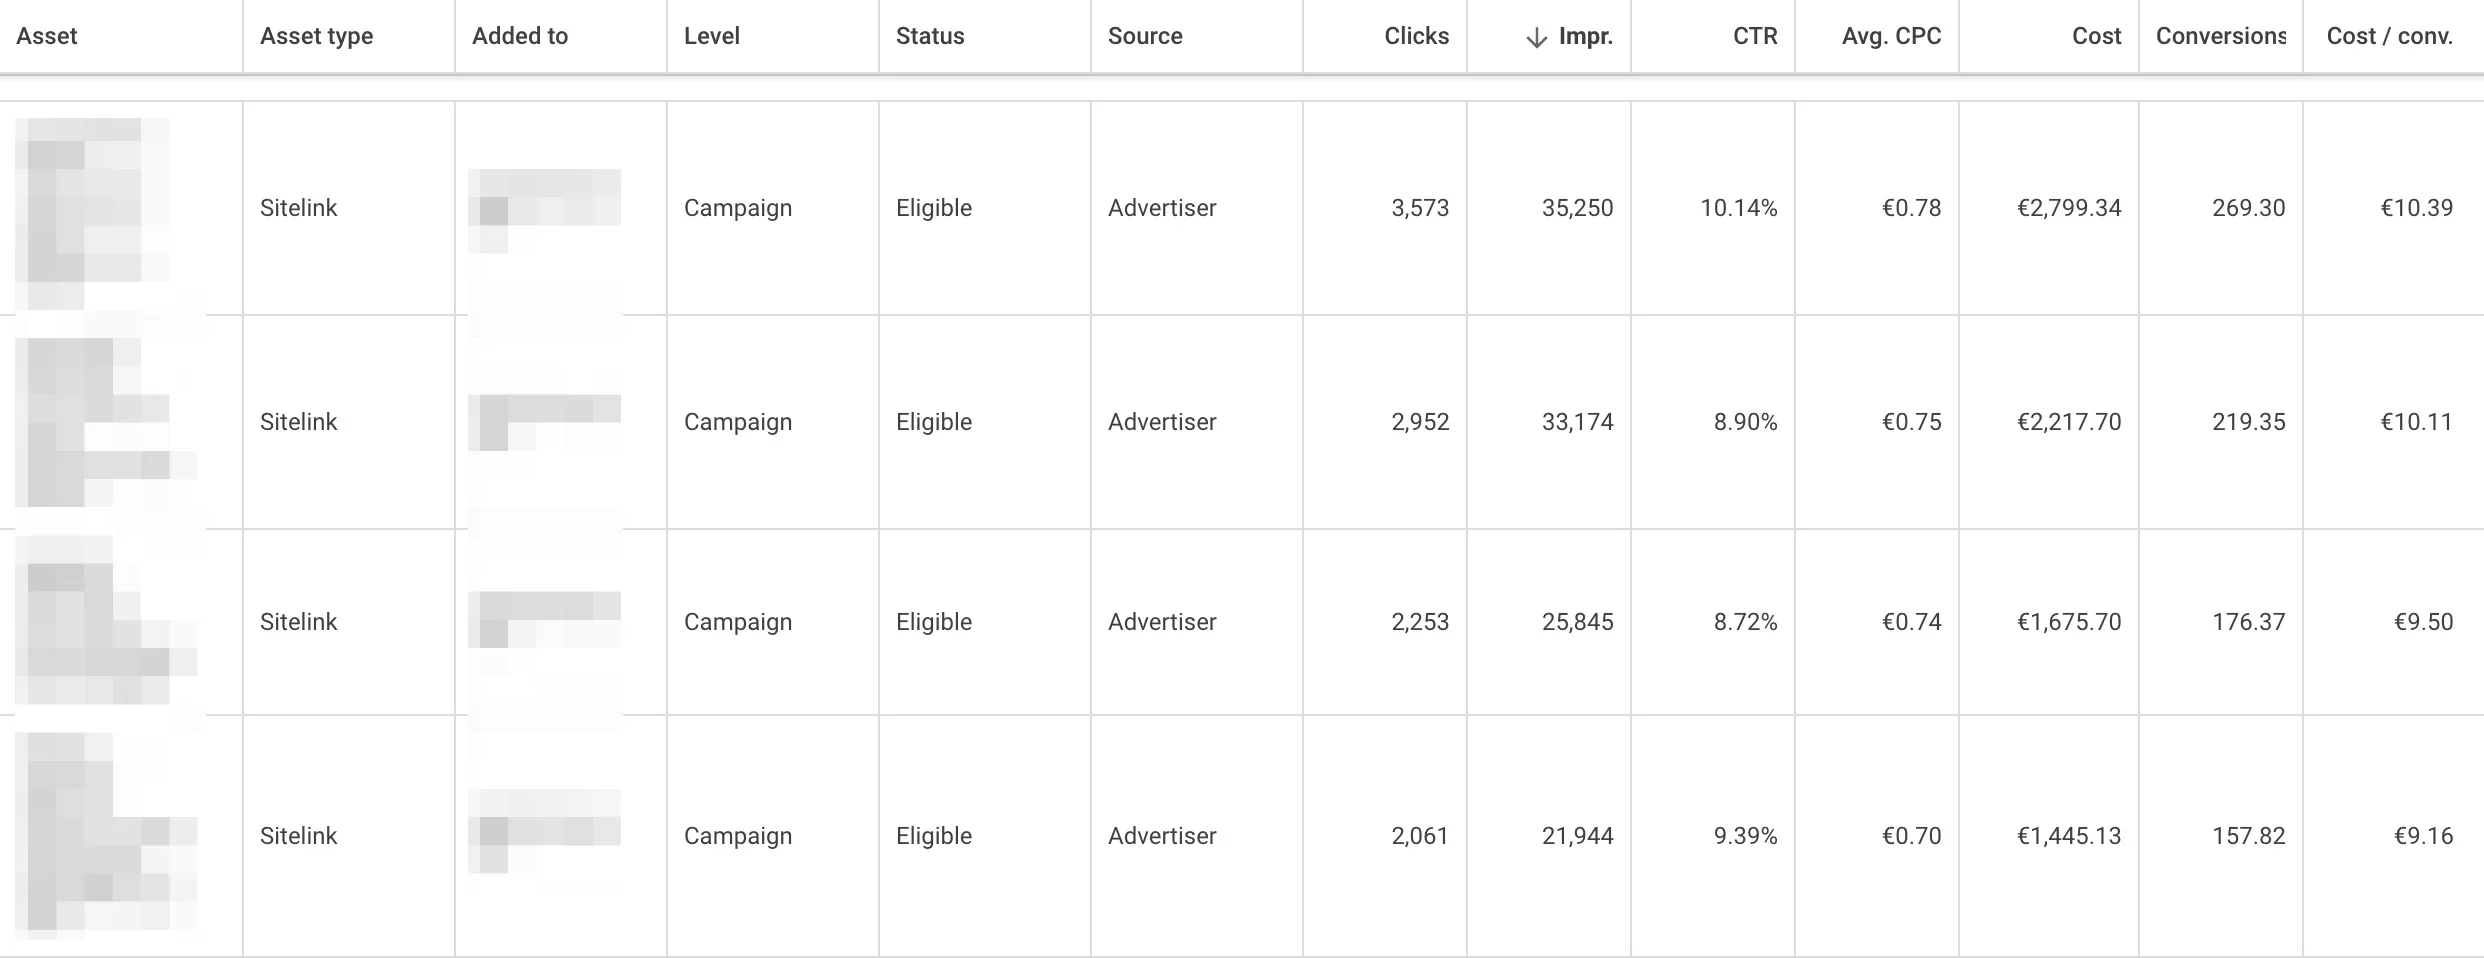
These are sitelinks, and you can see how many clicks, impressions, CTR and conversions. What’s important to remember, that the clicks are not on the assets, but on the ads, that contained those particular assets. This is an important distinction as you can click on Business logo, without clicking the ad. Same goes for image extension.
But you can see with which sitelinks your ads get higher CTR or get more conversions. Then you can start thinking why and maybe create more of the assets around the best performing one.
This is image extension. I have several images in this campaign so I could see which performs better and then leave just a few or one.

I see that two images kind of stand out. So I will leave those two, and try to create more images similar to the winning ones.
Looking at all your assets you can understand why some assets are more attractive to people. Then incorporate that in the ad text, even a landing page. This is additional source of information, that can help you optimize your Google Ads campaigns.
Google Ads assets: key points
- Assets provide additional information to search ads, supplementing the limited headline and description space. Examples include images, business names, callouts, and more. Not all assets appear every time due to factors like ad rank.
- There are 12 standard assets available (not counting the beta assets like Headline and Description). Assets can be scheduled and pinned for strategic use in campaigns.
- Assets are displayed based on the likelihood of improving performance and the ad’s Ad Rank and position. Higher Ad Rank and top ad positions on search pages are more likely to show assets.
- Assets enhance ad visibility and information, potentially increasing clicks and sales. They contribute to better ad ranking and can reduce overall ad spend due to higher click-through rates.
- Assets are created within the Google Ads interface under the Ads and Assets section. Different types of assets include Sitelinks, Callouts, App Assets, Price, Promotion, Image, Structured Snippets, Call, Lead Form, Location, Business Name, and Business Logo.
- Asset performance can be tracked in the same page where you created them. Insights from asset performance help optimize campaigns and improve overall effectiveness.
- There is no extra cost for adding assets, but clicks on assets are charged as usual. Google charges a maximum of two clicks per impression for each ad and its assets.
I share weekly tips on how to create, manage, and scale Google Ads campaigns. Subscribe to my free newsletter.
I’m also down with connecting on LinkedIn.
Or follow me on X, for some quick updates and fast insights.